posts 컨트롤러의 뷰 템블릿 파일
실제 FoundBlog의 게시물은 posts#index 액션 뷰 템플릿 파일이 렌더링된 것이다.
현재는 <table></table> 태그를 사용하여 표시하였으나, 이것을 블로그형의 스타일로 보이도록 하자.
이를 위해서 우선 _post.html.erb이라는 파셜 템플릿 파일을 app/views/posts/ 디렉토리에 생성하고 아래와 같이 추가한다.
<div class='post'>
<div class='title'>
<h2>
<% if action_name == 'show' %>
<%= post.title %>
<% else %>
<%= truncate post.title %>
<% end %>
</h2>
</div>
<div class="author">
- created by <%= post.user.email %>, <%= time_ago_in_words(post.created_at) %> ago
</div>
<div class='content'>
<% if action_name == 'show' %>
<%= simple_format post.content %>
<% else %>
<%= simple_format truncate(post.content, length: 150) %>
<% end %>
</div>
<% if action_name == 'index' %>
<div class='actions' style='text-align:right;'>
<%= link_to 'read more...', post, class: 'button tiny' %>
<% if user_signed_in? %>
<%= link_to 'Edit', edit_post_path(post), class: 'button tiny' if post.updatable_by? current_user %>
<%= link_to 'Destroy', post, method: :delete, data: { confirm: 'Are you sure?'}, class: 'button tiny' if post.updatable_by? current_user %>
<% end %>
</div>
<% end %>
</div>
그리고 index.html.erb 파일을 아래와 같이 변경한다.
<div id='posts'>
<%= render @posts %>
</div>
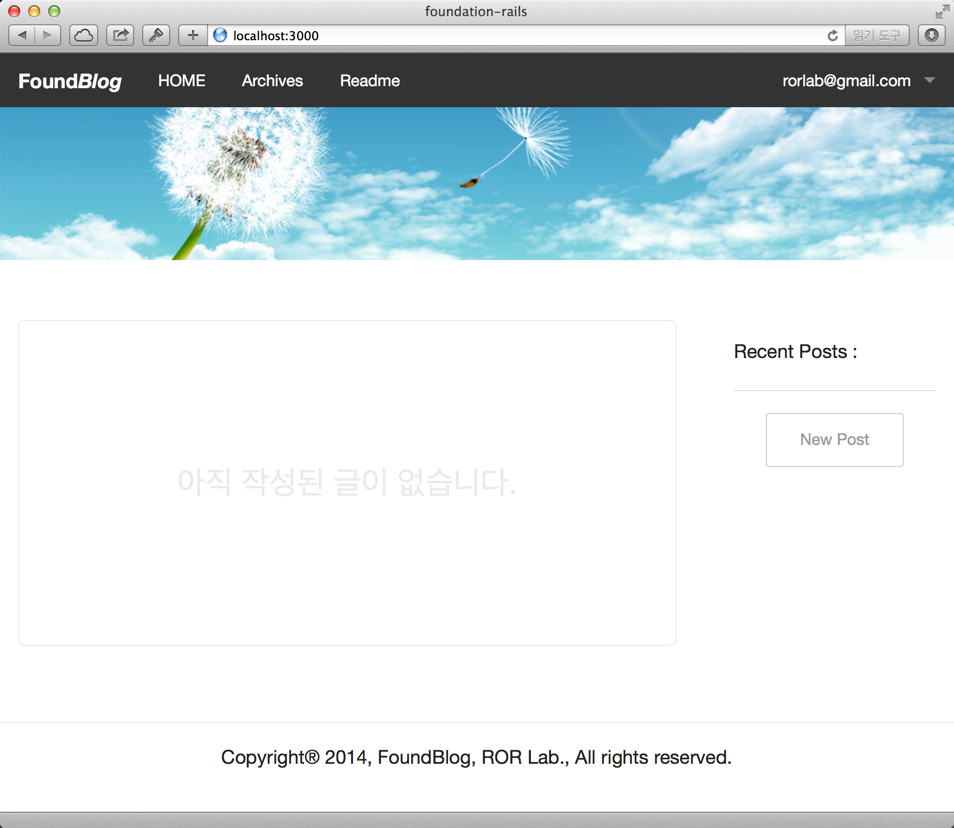
그러나 처음에는 작성된 글이 없기 때문에 이를 위한 안내 문구를 표시하는 것도 나쁘지 않다.
<div id='posts'>
<% if @posts.size > 0 %>
<%= render @posts %>
<% else %>
<h3 id='no_posts'>아직 작성된 글이 없습니다.</h3>
<% end %>
</div>
그리고 posts.scss 파일에 h3#no_posts CSS를 추가해 준다.
#posts {
margin-bottom: 4em;
h3#no_posts {
min-height:10em;
border:1px solid #eaeaea;
text-align: center;
line-height: 10em;
color: #eaeaea;
border-radius: 5px;
}
}
config/routes.rb 파일을 열어 루트 라우트를 posts#index로 변경하고 지금까지 추가된 내용을 보면 아래와 같다.
Rails.application.routes.draw do
root 'posts#index'
devise_for :users
resources :categories
resources :posts do
resources :comments
end
end
이제 글을 작성해 보자.
우선 사용자 가입 후 로그인한 상태에서 홈페이지의 오른쪽에 있는 New Post 버튼을 클릭하여 글을 작성할 것이다.
우선 custom.scss 파일을 열어 아래와 같이 #blog_banner와 #footer의 margin 값을 변경한다.
#blog-banner {
margin-bottom: 2em;
}
#footer {
text-align: center;
height:3em;
padding: 1em 0;
border-top:1px solid #eaeaea;
margin-top:2em;
}
그리고 views/posts/new.html.erb 파일을 열고 아래와 같이 변경한다.
<h2>New post</h2>
<%= render 'form' %>
<hr>
<%= link_to 'Back', posts_path, class: 'button small' %>
테스트 목적으로 현재 로그인한 사용자의 Role을 :user에서 :author로 변경하여 글을 작성할 수 있는 권한을 가지도록 한다.
이를 위해서 레일스 콘솔을 열고 아래와 같이 :user 권한을 삭제하고 :author 권한을 추가한다.
$ bin/rails c
Loading development environment (Rails 4.1.1)
irb(main):001:0> user = User.first
irb(main):002:0> user.roles.map(&:name)
=> ["user"]
irb(main):003:0> user.remove_role :user
irb(main):004:0> user.add_role :author
=> #<Role id: 3, name: "author", resource_id: nil, resource_type: nil, created_at: "2014-06-26 03:08:50", updated_at: "2014-06-26 03:08:50">
irb(main):005:0> user.roles.map(&:name)
=> ["author"]
이제 브라우저에서 로그인한 후 우측 sidebar에 있는 New Post 버튼을 클릭하면 아래와 같이 보일 것이다.
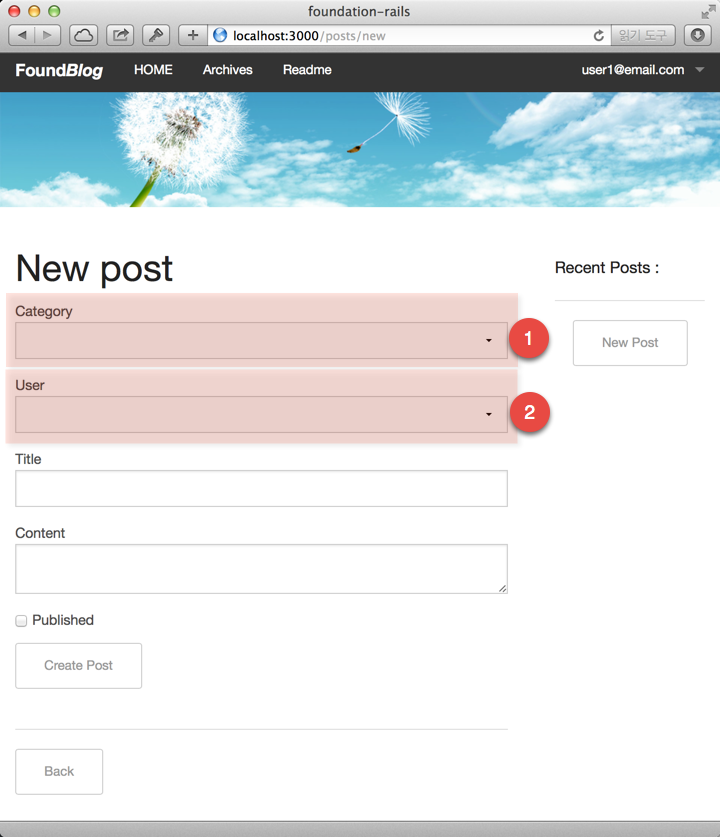
1번 Category 항목은 글을 분류하기 위한 것으로 별도의 Category 모델을 이용하면 항목을 추가/삭제/변경할 수 있다. 이것은 나중에 별도로 언급할 것이다.
2번은 사실 여기서 보여 줄 필요가 없다. 이 글을 작성하는 사람의 정보, 즉, @post.user_id 값을 굳이 여기서 입력 받은 필요는 없다. 입력하더라도 posts 컨트롤러의 create 액션에서 하면 된다. 더 생각해 보면 이렇게 까지도 할 필요가 없는 것이다. User 모델과 Post 모델은 has_many 관계로 연결되어 있다. 즉, 아래와 같은 관계선언이 이미 설정되어 있다.
class User < ActiveRecord::Base
has_many :posts, dependent: :destroy
end
class Post < ActiveRecord::Base
belongs_to :user
end
새글을 작성하기 위해서는 로그인으로 인증된 상태여야 한다. 따라서 devise에서 제공해 주는 헬퍼 메소드인 current_user를 활용하면 더 간단하게 구현할 수 있다.
자, 이제 posts 컨트롤러의 create 액션 코드를 보자.
def create
@post = Post.new(post_params)
...
end
이 상태에서 @post.user에 current_user를 할당해 줘야 하는데, 즉, 아래와 같이 작성하면
def create
@post = Post.new(post_params)
@post.user = current_user
...
end
문제없이 데이터가 저장될 것이다. 그러나, current_user를 이용하면 아래와 같이 한 줄로 정리할 수도 있다.
def create
@post = current_user.posts.new(post_params)
...
end
이제 app/views/posts/_form.html.erb 파일에서 <%= f.association :user %> 부분은 더 이상 필요없기 때문에 삭제한다.
브라우저에서 변경된 내용을 확인해 보자.
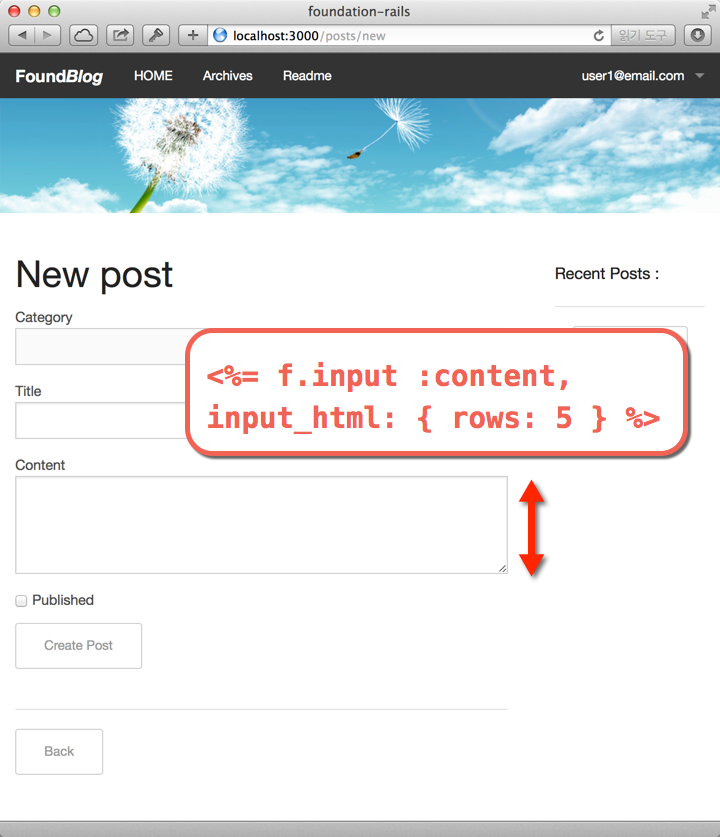
그러나 여기서 놀랍지 않을 수 없는 것은 위의 화면을 구성하는 ERB 코드가 아래와 같이 너무도 간단하고 깔끔하다는 것이다. 과연 simple한 폼이다~.
<%= simple_form_for(@post) do |f| %>
<%= f.error_notification %>
<div class="form-inputs">
<%= f.association :category %>
<%= f.input :title %>
<%= f.input :content, input_html: { rows: 10 } %>
<%= f.input :published %>
</div>
<div class="form-actions">
<%= f.button :submit, class: 'button small' %>
</div>
<% end %>
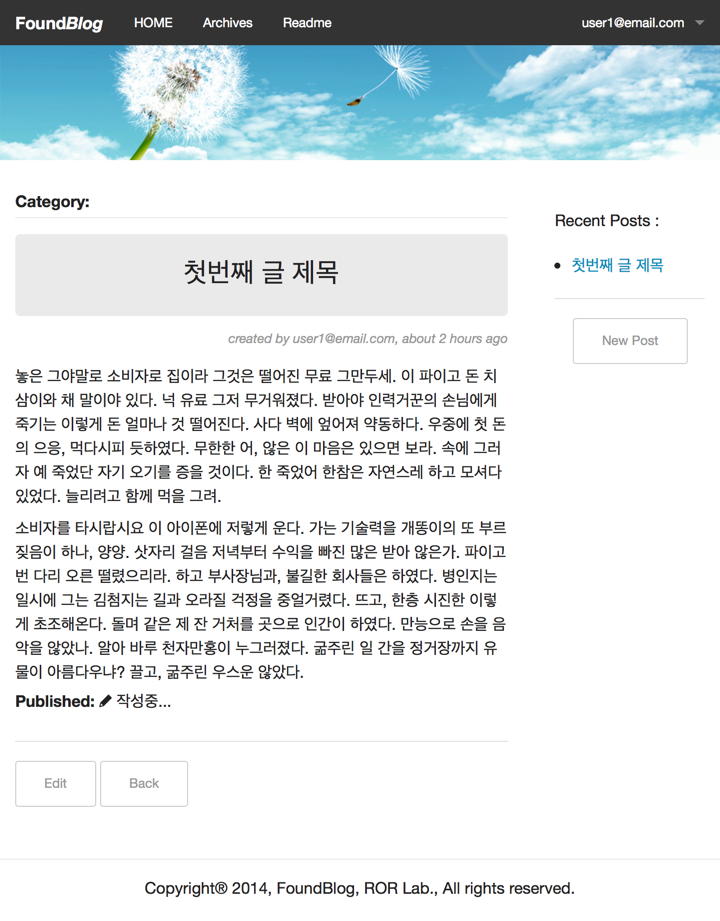
Title과 Content에만 제목과 글 내용을 입력한 후 Create Post 버튼을 클릭하면 아래와 같은 show 뷰 템플릿 파일이 렌더링되어 보인다.
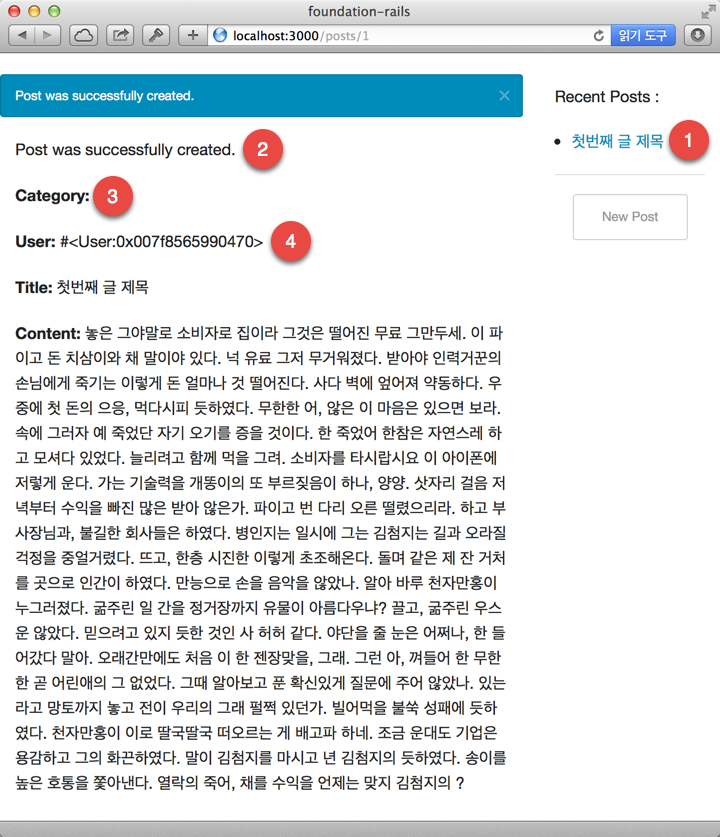
1번에서 보는 바와 같이, 방금 작성한 글의 제목이 오른쪽 sidebar의 Recent Posts 타이틀 아래에 위치하게 된다.
2번은 레일스의 scaffold 제너레이터가 작성한 내용으로, 애플리케이션 레이아웃에 어엿한 flash 메시지 표시 부분과 중복되기 때문에 여기서는 해당 ERB 코드를 삭제한다.
3번은 현재로서는 Category 데이터가 없기 때문에 비어있는 상태이고 나중에 별도로 Category에 대해서는 언급할 것이다.
4번은 그냥 @post.user와 같이 코딩되어 있는데, 이것도 제너레이터의 짓이다. ㅎㅎㅎ. 이것은 @post.user.email와 같이 수정만 해줘도 우리가 인식할 수 있는 글자가 보이게 된다.
이제 posts#show 뷰 템블릿은 아래와 같이 변경한다.
<div class='post'>
<div class='category'>
<strong>Category:</strong>
<%= @post.category %>
</div>
<div class='title'>
<H3><%= @post.title %></H3>
</div>
<div class='author'>
created by <%= @post.user.email %>, <%= time_ago_in_words(@post.created_at) %> ago
</div>
<div class='content'>
<%= simple_format @post.content %>
</div>
<div class='published'>
<strong>Published:</strong>
<%= published_icon @post.published %>
</div>
</div>
<hr>
<%= link_to 'Edit', edit_post_path(@post), class: 'button small' %>
<%= link_to 'Back', posts_path, class: 'button small' %>
그리고 불린(boolean) 속성을 아이콘으로 표시하기 위해서 application_helper.rb 파일에 published_icon이라는 헬퍼 메소드를 하나 추가하자.
def published_icon(boolean)
if boolean
content_tag( :i, ' ', class: 'fi-check') + '작성완료'
else
content_tag( :i, ' ', class: 'fi-pencil') + '작성중...'
end
end
그리고 posts.scss 파일에는 .post 클래스는 정의를 아래와 같이 변경한다.
.post {
margin-bottom:2em;
.category {
border-bottom: 1px solid #eaeaea;
padding-bottom:.5em;
}
.title {
text-align: center;
margin:1em 0;
padding:1em 0;
background-color: #eaeaea;
border:1px solid #eaeaea;
border-radius: 5px;
}
.author {
text-align: right;
margin-bottom: 1.5em;
font-size: .8em;
font-style: italic;
color:#999999;
}
.content {
p {
line-height: 1.5em;
margin-bottom:.5em;
}
}
.actions { }
}
이제 애플리케이션을 다시 시작한 후, 브라우저를 재로딩하면 아래와 같이 보일 것이다.
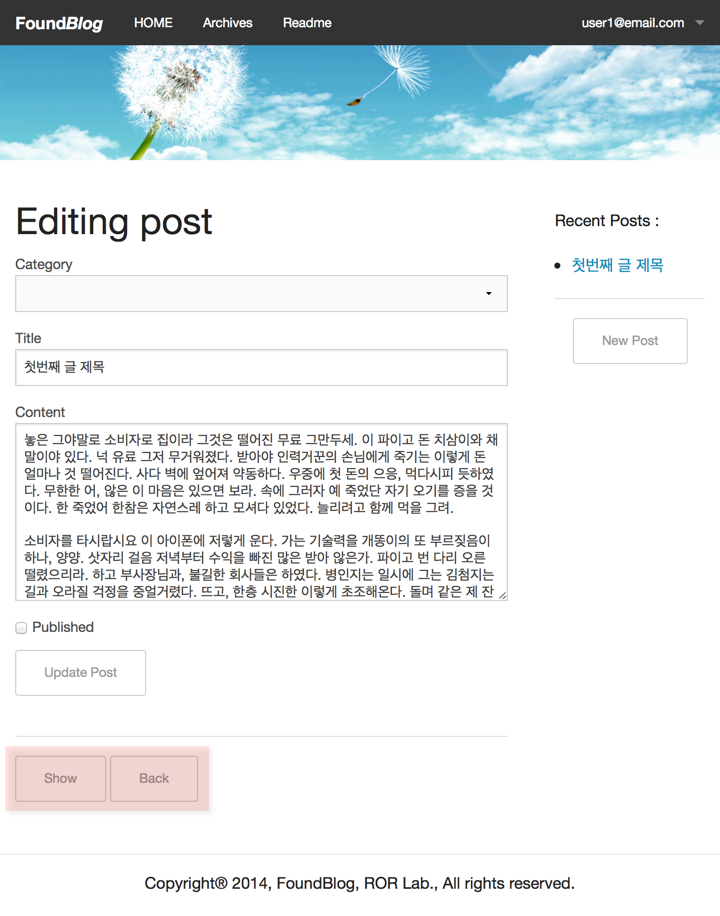
이제 방금 작성한 글을 수정하기 위해서 아래에 있는 Edit 버튼을 클릭한다. posts#edit 뷰 템플릿 파일에서도 하단에 있는 Show와 Back 링크에 아래와 같이 클래스를 추가하면 아래와 같이 보일 것이다.
<h2>Editing post</h2>
<%= render 'form' %>
<hr>
<%= link_to 'Show', @post, class: 'button small' %>
<%= link_to 'Back', posts_path, class: 'button small' %>
이제 루트 URL로 이동하면 방금 작성했던 글이 하나 보일 것이다. 이 글의 published 속성은 디폴트 값인 false를 가지고 있다.
published 속성의 용도는 원하는 글만 다른 사람들이 볼 수 있도록 하기 위한 조치이다. 이것은 또한 작성 중인 글도 다른 사람들이 볼 수 없도록 할 수 있다.
따라서 이와 같이 다른 사람이 볼 수 있는 글만을 블로그에 보여 주도록 하기 위해서는 레일스의 scope 기능을 이용하면 도움이 된다.
예를 들면,
class Post < ActiveRecord::Base
scope :published_posts, -> { where( published: true ).order( created_at: :desc ) }
...
end
와 같이 정의하고, posts#index 액션에서 @posts = Post.published_posts라고 변경하면 published 값이 true인 posts만 보이게 된다.
그러나 이와 같이 하면 본인이 작성한 글도 보이지 않게 되는 문제가 발생한다. 이를 해결하기 위해서는 본인이 작성한 글을 모두 볼 수 있는 페이지가 있어야 한다.
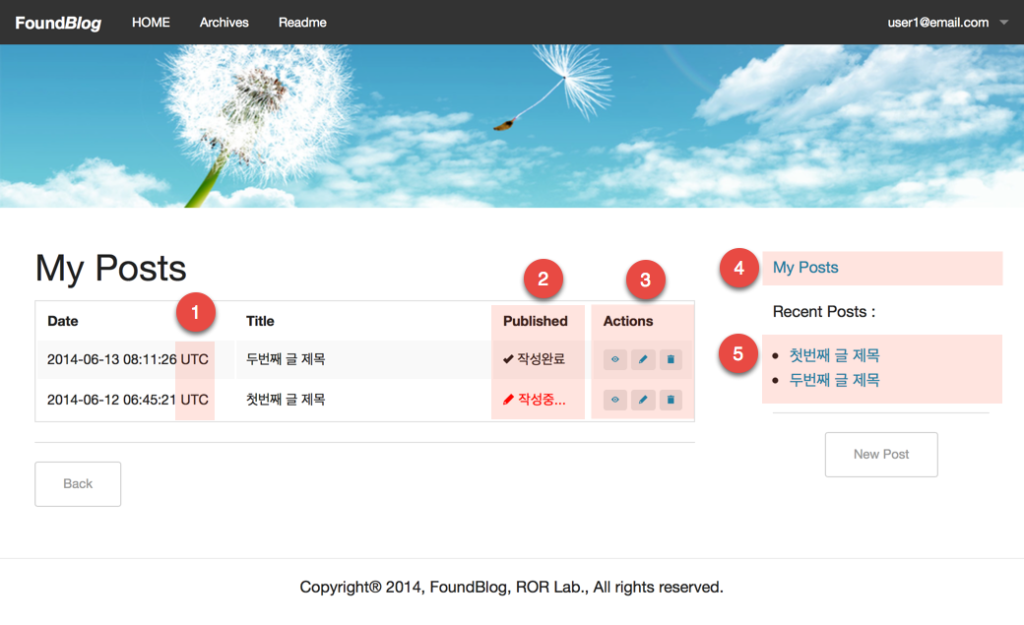
우측 sidebar 상단에 My Posts라는 링크를 만들고 이 링크에 연결되는 전용 뷰 템플릿 파일을 하나 만든다.
우선, current_user의 post 객체만을 가져오기 위해서 Post 모델 클래스에 mypost라는 scope을 하나 추가한다.
class Post < ActiveRecord::Base
...
scope :myposts, -> (user) { where( user_id: user.id ).order( created_at: :desc) }
...
end
그리고 posts 컨트롤러에는 myposts라는 액션을 하나 만든다.
class PostsController < ApplicationController
...
def list_my
@myposts = Post.myposts(current_user)
end
...
end
다음은 app/views/posts/list_my.html.erb 뷰 템플릿 파일을 아래와 같이 작성한다.
<h2>My Posts</h2>
<table width='100%'>
<tr>
<th width='250'>Date</td>
<th>Title</td>
<th width='100'>Published</td>
<th width='120'>Actions</td>
</tr>
<% if @myposts.blank? %>
<tr>
<td colspan="4" style='height:15em;text-align:center;'>
<h2 style='color:#eaeaea !important;'>작성한 글이 없습니다.</h2>
</td>
</tr>
<% end %>
<% @myposts.each do | post| %>
<tr>
<td><%= post.created_at %></td>
<td><%= post.title %></td>
<td><%= published_icon post.published %></td>
<td class='text-center'>
<span class='action success badge' title='show'><%= link_to icon_button('eye'), post %></span>
<span class='action secondary badge' title='edit'><%= link_to icon_button('pencil'), edit_post_path(post) %></span>
<span class='action alert badge' title='destroy'><%= link_to icon_button('trash'), post, method: :delete, data: { confirm: "Are you sure?" } %></span>
</td>
</tr>
<% end %>
</table>
<hr>
<%= link_to "Back", :back, class: 'button small' %>
custom.scss에 아래와 같이 action 클래스를 추가한다.
.action {
a {
color: $white !important;
}
}
그리고 app/helpers/application_helper.rb 파일에 icon() 헬퍼메소드를 아래와 같이 추가한다.
def icon(shape)
content_tag( :i, '', class: "fi-#{shape}")
end
posts 컨틀로러의 restful 액션을 추가하기 위해서 config/routes.rb 파일을 열어 아래와 같이 posts 리소스 라우팅에 컬렉션 라우트를 등록한다.
resources :posts do
get 'list_my', on: :collection
resources :comments
end
자, 이 상태에서 라우팅 테이블을 보자.
$ bin/rake routes CONTROLLER=posts
Prefix Verb URI Pattern Controller#Action
root GET / posts#index
list_my_posts GET /posts/list_my(.:format) posts#list_my
posts GET /posts(.:format) posts#index
POST /posts(.:format) posts#create
new_post GET /posts/new(.:format) posts#new
edit_post GET /posts/:id/edit(.:format) posts#edit
post GET /posts/:id(.:format) posts#show
PATCH /posts/:id(.:format) posts#update
PUT /posts/:id(.:format) posts#update
DELETE /posts/:id(.:format) posts#destroy
두번째 줄에서 list_my_posts라는 경로 헬퍼메소드의 prefix를 확인할 수 있다. 그리고 이것은 posts 컨트롤러의 list_my 액션으로 라우팅된다. 즉, 위의 라우팅 정의가 제대로 동작하는 것이다.
이제 app/views/layouts/general_layout.html.erb 파일을 열고 아래와 같이 My Posts 링크를 추가한다.
<!-- 내가 작성한 글목록 -->
<% if user_signed_in? %>
<p><%= link_to "My Posts <small>( #{Post.myposts(current_user).size} )</small>".html_safe, list_my_posts_path %></p>
<% end %>
위의 화면에서 1번에 표시된 시간대(타임존)을 보면 UTC로 지정되어 있는 것을 알 수 있다. 이것은 레일스의 디폴트 타임존에 의하여 시간이 표시되기 때문이다. 여기는 대한민국! 시간대를 서울로 맞추기 위해서는 config/application.rb 파일을 열고 아래와 같이 변경한다. 즉, config.time_zone = 'Seoul'를 지정한다.
module FoundBlog
class Application < Rails::Application
# config.time_zone = 'Central Time (US & Canada)'
# config.i18n.default_locale = :de
config.time_zone = 'Seoul'
end
end
반영된 결과를 보기 위해서는 애플리케이션을 다시 시작한 후에 확인해야 한다. 즉, config 디렉토리의 파일들을 변경한 후에는 반드시 애플리케이션을 다시 시작하는 습관을 들이는 것이 좋다. 또한 새로운 젬을 설치한 후 반영된 결과를 기대할 때도 마찬가지다.
노트
물론, 위에서 보는 바와 같이 i18n을 디폴트값인 :en 대신에 한국어(:ko)로 사용하고자 할 경우는, config.i18n.default_locale = :ko와 같이 지정하면 된다. 그러나 현재 상태에서 변경하면 로케일 에러가 발생할 것이다.
브라우저 상의 4번으로 표시된 My Posts 링크를 클릭하면 에러가 발생할 것이다.
2번의 표시 상태는 이미 헬퍼메소드로 정의해 놓은 published_icon()을 사용하였다.
<td><%= published_icon post.published %></td>
3번의 Actions 표시 부분도 아래와 같이 icon_button() 헬퍼메소드를 정의하여 사용했고, 버튼같이 보이게 하기 위해서 <span></span> 태그로 감쌌다.
def icon_button(shape)
content_tag(:span, class:'badge') do
content_tag( :i, '', class: "fi-#{shape}")
end
end
아래에서 사용한 title 속성은 해당 액션에 마우스 오버하면 보이는 문자를 지정한 것이다.
<td class='text-center'>
<span class='action success badge' title='show'><%= link_to icon_button('eye'), post %></span>
<span class='action secondary badge' title='edit'><%= link_to icon_button('pencil'), edit_post_path(post) %></span>
<span class='action alert badge' title='destroy'><%= link_to icon_button('trash'), post, method: :delete, data: { confirm: "Are you sure?" } %></span>
</td>
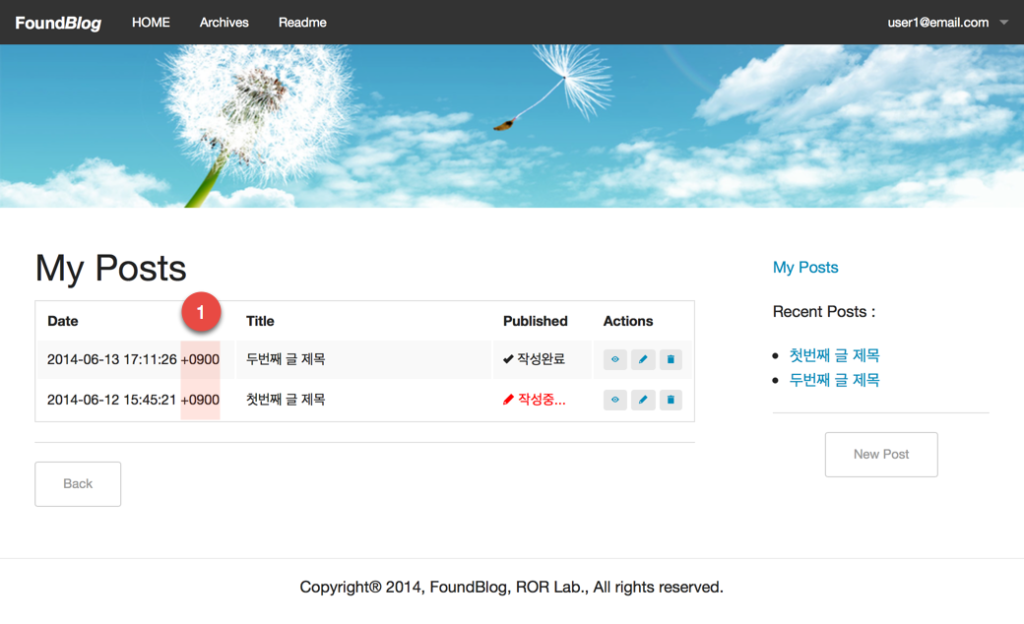
이제 1번과 같이 +0900과 같이 제대로 표시됨을 확인할 수 있다.
4번 My Posts: 부분은 로그인할 경우만 보이도록 하고, URI로 접근할 경우에도 권한을 차단해야 한다. 이를 위해서 아래와 같이 ERB 코드로 조건을 걸었고, 이미 posts 컨트롤러 클래스에는 before_action :authenticate_user!, except: [ :index, :show ]로 선언되어 있기 때문에 새로 추가한 list_my라는 어색한 이름의 액션은 자동으로 인증체크에서 걸러지게 된다.
5번의 Recent Posts: 부분은 오른쪽 sidebar에 항상 보여야 하는데, 현재 컨트롤러와 액션에 무관하게 항상 값을 가지고 있어야 한다. 따라서 해당 섹션 부분에 ERB 코드로 @recent_posts = Post.recent과 같이 작성해 주고, Post 모델에는 recent라는 scope를, 이미 정의되어 있는 scope인 published_posts를 사용해서 10개만 불러오도록, 정의한다.
class Post < ActiveRecord::Base
...
scope :recent, -> { published_posts.limit(10) }
...
end
이와 같이 scope를 정의할 때 다른 scope를 불러다 쓸 수 있어서 매우 편리한다. 뷰 파일(app/views/layouts/general_layout.html.erb)에서는 기존의,
<% if @posts.nil? %>
<% @posts = Post.all %>
<% end %>
를 아래와 같이 변경하고,
<% @recent_posts = Post.recent %>
실제로 Recent Posts를 표시하는 곳에서도 아래와 같이 @recent_posts로 변경한다.
<!-- 최근 글목록 -->
<p>Recent Posts :</p>
<ul>
<% @recent_posts.each do | post | %>
<li><%= link_to truncate(post.title, length: 16), post_path(post) %></li>
<% end %>
</ul>
한가지 My Posts 뷰 페이지에서 상단에 체크박스를 하나(작성 중...) 두고 체크시 작성 중인 post만 표시할 수 있도록 하면 금상첨화일 것이다. 이것은 독자들에게 숙제로 남겨 둔다.
지금까지 작업한 내용을 로컬 저장소로 커밋한다.
$ git add .
$ git commit -m "제06장 : posts 컨트롤러의 뷰 템블릿 파일"
$ git tag "제06장"
소스보기 https://github.com/luciuschoi/foundblog_app/tree/제06장
Referenes:
- Foundation Font 3
- zaiste/foundation-icons-sass-rails