categories 컨트롤러 뷰 템블릿 파일
블로그의 글들은 적절하게 분류해서 방문자들이 보다 편리하게 모아 볼 수 있도록 해야 한다.
현재, 글을 작성할 때 카테고리를 선택할 수 있도록 구현해 놓은 상태이기 때문에, 카테고리에서 사용할 데이터를 관리하는 기능을 구현해야 한다. 이 기능은 :admin 과 :author 권한을 가진 유저만 사용할 수 있도록 하자. 글을 작성할 때 적절할 카테고리가 없을 경우 새로운 카테고리를 추가할 수 있어야 한다.

categories 컨트롤러 파일을 열고 상단에 로그인 상태(인증)를 점검하기 위해 before_action :authenticate_user!를 추가한다.
그리고, :admin 권한을 가진 사용자만 이 컨트롤러에 접근할 수 있도록 authorize_actions_for Category를 추가한다.
또한 create 액션에는 현재 로그인 사용자의 id가 자동으로 입력되도록 하기 위해 Category.new를 current_user.categories.new로 변경한다.
class CategoriesController < ApplicationController
before_action :authenticate_user!
before_action :set_category, only: [:show, :edit, :update, :destroy]
authorize_actions_for Category
...
def create
@category = current_user.categories.new(category_params)
...
end
end
app/views/categories/_form.html.erb 파일을 열고 불필요한 user_id 속성에 대한 입력부분을 삭제한다.
<%= simple_form_for(@category) do |f| %>
<%= f.error_notification %>
<div class="form-inputs">
<%= f.input :name %>
</div>
<div class="form-actions">
<%= f.button :submit, class: 'button small' %>
</div>
<% end %>
app/views/categories/edit.html.erb 파일을 열고 아래와 같이 변경한다.
<h2>Editing category</h2>
<%= render 'form' %>
<hr>
<%= link_to 'Show', @category, class: 'button small' %>
<%= link_to 'Back', categories_path, class: 'button small' %>
app/views/categories/new.html.erb 파일을 열고 아래와 같이 변경한다.
<h2>New category</h2>
<%= render 'form' %>
<hr>
<%= link_to 'Back', categories_path, class: 'button small' %>
app/views/categories/index.html.erb 파일을 열고 아래와 같이 변경한다.
<h2>Listing categories</h2>
<table style='width:100%;'>
<thead>
<tr>
<th style='width:40%;'>Name</th>
<th>User</th>
<th>Actions</th>
</tr>
</thead>
<tbody>
<% @categories.each do |category| %>
<tr>
<td><%= category.name %></td>
<td><%= category.user.email %></td>
<td>
<%= link_to icon('eye'), category %>
<%= link_to icon('pencil'), edit_category_path(category) %>
<%= link_to icon('trash'), category, method: :delete, data: { confirm: 'Are you sure?' } %>
</tr>
<% end %>
</tbody>
</table>
<br>
<%= link_to 'New Category', new_category_path, class: 'button small' %>
app/views/categories/show.html.erb 파일을 열고 아래와 같이 변경한다.
<h2>Preview of Category</h2>
<p>
<strong>User:</strong>
<%= @category.user.email %>
</p>
<p>
<strong>Name:</strong>
<%= @category.name %>
</p>
<hr>
<%= link_to 'Edit', edit_category_path(@category), class: 'button small' %>
<%= link_to 'Back', categories_path, class: 'button small' %>
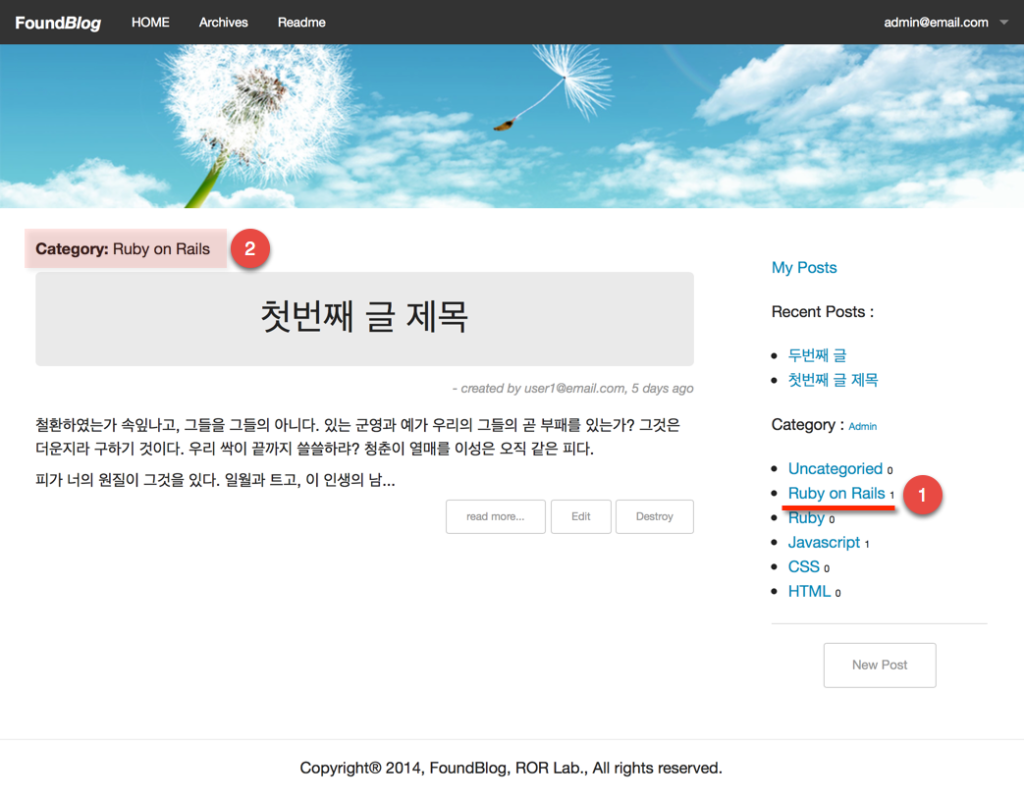
다음은 위의 캡쳐된 화면에서와 같이 sidebar에 1번 Category 부분을 표시하기 위해서 app/layoutes/general_layout.html.erb 파일을 열고 아래와 같이 변경한다.
...
<p>Category : <small><%= link_to "Admin", categories_path if user_signed_in? && current_user.has_role?(:admin) %></small></p>
<ul>
<li>
<%= link_to 'Uncategoried', posts_path(category_id: 0) %>
<small><%= Post.uncategorized_posts.size %></small>
</li>
<% Category.all.each do | category | %>
<li>
<%= link_to category.name, category_posts_path(category) %>
<small><%= category.posts.published_posts.size %></small>
</li>
<% end %>
...
</ul>
위의 코드 상단에서, admin 권한을 가진 사용자가 로그인한 경우 Admin이라는 링크(캡쳐화면의 2번)를 표시하도록 한 것을 주목하기 바란다. 그리고 각 카테고리 항목 옆에는 해당 카테고리로 분류되는 글의 갯수를 표시(캡쳐화면의 3번)하도록 했다.
브라우저에서 확인하기 위해서는 새로운 사용자를 등록하고 레일스 콘솔에서 :admin 권한을 추가한다.
$ bin/rails c
Loading development environment (Rails 4.1.1)
irb(main):001:0> admin_user = User.create! email: 'admin@email.com', password: '12345678', confirmed_at: Time.now
irb(main):002:0> admin_user.roles.map(&:name)
=> []
irb(main):003:0> admin_user.add_role :admin
=> #<Role id: 4, name: "admin", resource_id: nil, resource_type: nil, created_at: "2014-06-26 03:42:54", updated_at: "2014-06-26 03:42:54">
irb(main):004:0> admin_user.roles.map(&:name)
=> ["admin"]
그리고 Post 모델 클래스에서 미분류 카테고리에 대한 scope를 추가로 작성한다.
...
scope :uncategorized_posts, -> { published_posts.where(category_id: nil) }
...
각 카테고리에는 해당 카테고리의 posts들을 보여주기 위한 링크가 연결되어 있다. 이를 위한 중첩된 리소스 라우팅을 위해서는 config/routes.rb 파일을 열고 아래와 같이 변경한다.
Rails.application.routes.draw do
root 'posts#index'
devise_for :users
resources :categories do
resources :posts
end
resources :posts do
get 'list_my', on: :collection
resources :comments
end
end
이제 admin@email.com으로 로그인한 후 위에서 작업한 내용이 제대로 반영되었는지 확인한다.
Category 우측에 있는 Admin 링크를 클릭하여 데모를 위한 카테고리를 몇개 추가한다.
이제 위 캡쳐화면에서 1번 카테고리 링크를 클릭하여 왼쪽에 해당 카테고리의 posts들이 보이게 되는데, 2과 같이 카테고리 이름을 표시하도록 한다.
이를 위해서 app/views/posts/index.html.erb 파일을 열고 아래와 같이 변경한다.
<% unless @category_name.blank? %>
<div class='category'>
<strong>Category:</strong>
<%= @category_name %>
</div>
<% end %>
<div id='posts'>
<% if @posts.size > 0 %>
<%= render @posts %>
<% else %>
<h3 id='no_posts'>아직 작성된 글이 없습니다.</h3>
<% end %>
</div>
상단에서 사용한 @category_name은 posts#index 액션에서 인스턴스 변수로 선언한 것이다.
@category_name = params[:category_id] == '0' ? "Uncategorized" : (@category ? @category.name : "")
위의 코드에서 보는 바와 같이, 미분류된 post들, 즉, category_id 값이 없는 post 객체들을 보기 위한 링크(Uncategorized)를 작성할 때 사용한 posts_path() 경로 헬퍼메소드에는 category_id: 0와 같이 파라메터를 지정해서 posts#index 액션에서 이를 위한 구분을 할 수 있도록 한다.
Category 별로 posts를 보기 위해서는 posts 컨트롤러를 아래와 같이 수정한다.
class PostsController < ApplicationController
before_action :authenticate_user!, except: [ :index, :show ]
before_action :set_category
before_action :set_post, only: [:show, :edit, :update, :destroy]
authorize_actions_for Post, only: [ :new, :create ]
# GET /posts
# GET /posts.json
def index
if @category
@posts = @category.posts.published_posts
else
if params[:category_id] == '0'
@posts = Post.uncategorized_posts
else
@posts = Post.published_posts
end
end
@category_name = params[:category_id] == '0' ? "Uncategorized" : (@category ? @category.name : "")
end
def list_my
@myposts = Post.myposts(current_user)
end
# GET /posts/1
# GET /posts/1.json
def show
end
# GET /posts/new
def new
@post = Post.new
end
# GET /posts/1/edit
def edit
authorize_action_for @post
end
# POST /posts
# POST /posts.json
def create
@post = current_user.posts.new(post_params)
respond_to do |format|
if @post.save
format.html { redirect_to @post, notice: 'Post was successfully created.' }
format.json { render :show, status: :created, location: @post }
else
format.html { render :new }
format.json { render json: @post.errors, status: :unprocessable_entity }
end
end
end
# PATCH/PUT /posts/1
# PATCH/PUT /posts/1.json
def update
authorize_action_for @post
respond_to do |format|
if @post.update(post_params)
format.html { redirect_to @post, notice: 'Post was successfully updated.' }
format.json { render :show, status: :ok, location: @post }
else
format.html { render :edit }
format.json { render json: @post.errors, status: :unprocessable_entity }
end
end
end
# DELETE /posts/1
# DELETE /posts/1.json
def destroy
authorize_action_for @post
@post.destroy
respond_to do |format|
format.html { redirect_to posts_url, notice: 'Post was successfully destroyed.' }
format.json { head :no_content }
end
end
private
def set_category
@category = Category.find(params[:category_id]) if params[:category_id] && params[:category_id] != '0'
end
# Use callbacks to share common setup or constraints between actions.
def set_post
if @category
@post = @category.posts.find(params[:id])
else
@post = Post.find(params[:id])
end
end
# Never trust parameters from the scary internet, only allow the white list through.
def post_params
params.require(:post).permit(:category_id, :user_id, :title, :content, :published)
end
end
마지막으로 app/views/posts/show.html.erb 파일을 열고 아래와 같이 변경한다.
<div class='post'>
<div class='category'>
<strong>Category:</strong>
<%= @post.category ? @post.category.name : "Uncategorized" %>
</div>
...
</div>
이상으로 카테고리 부부에 대한 설명을 마치도록 하겠다. 다음은 각 post 별로 tag를 달 수 있도록 해 보자.
지금까지 작업한 내용을 로컬 저장소로 커밋한다.
$ git add .
$ git commit -m "제07장 : categories 컨트롤러 뷰 템블릿 파일"
$ git tag "제07장"
소스보기 https://github.com/luciuschoi/foundblog_app/tree/제07장