다이나믹 레이아웃의 작성
레일스는 디폴트 상태에서 특정 컨트롤러의 액션이 호출될 때, 해당 액션의 뷰 템플릿에 대한 렌더링 결과를 애플리케이션 레이아웃 파일(application.html.erb)에 삽입(<%= yield %>)하여 사용자의 브라우저로 보낸다.
그러나, app/views/layouts/ 디렉토리에 특정 컨트롤러에 해당하는 레이아웃 파일이 존재(컨트롤러 이름에 .html.erb 확장자를 붙인 파일)할 때는, 렌더링 결과를 컨트롤러용 레이아웃 파일에 삽입하여 응답결과로 보내게 된다.
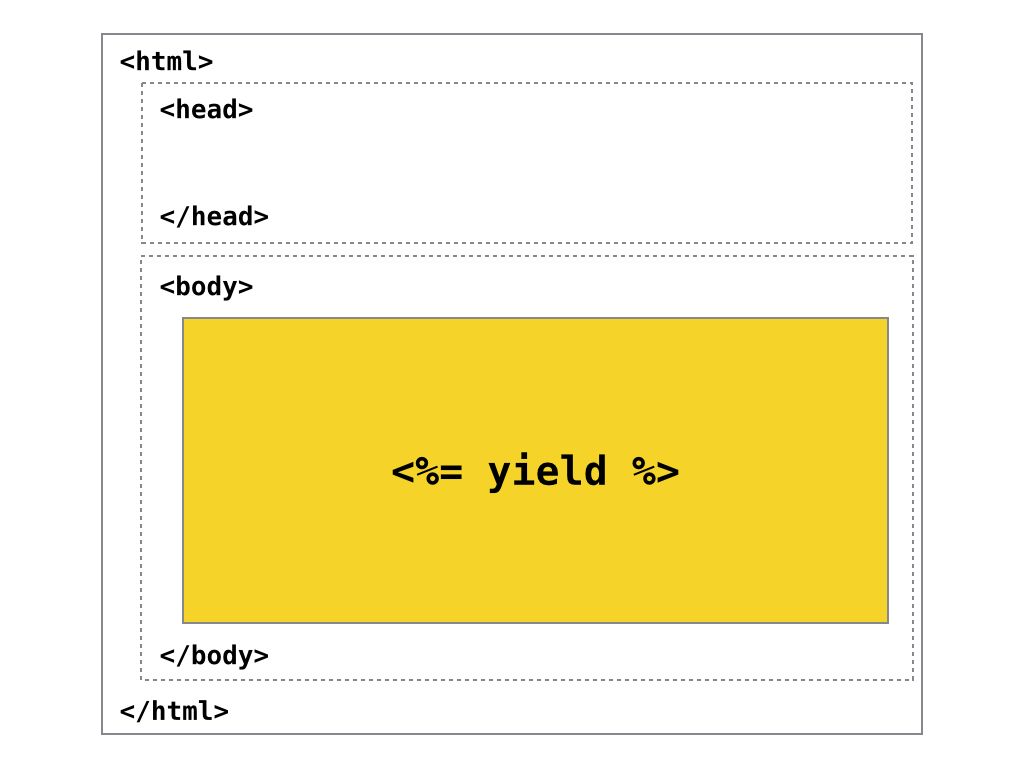
이 프로젝트에서는 <body></body> 사이에 레이아웃의 구성을 header, trunk, footer 3개의 구역으로 구분한다. 그리고 trunk 구역에 <%= yield %> 결과를 삽입한다.

header 구역은 다시 topbar와 blog image 구역으로 나누었으며 topbar 구역에는 메뉴바가 위치하게 되고 blog image 구역에는 블로그 헤더 이미지를 위치하도록 한다.
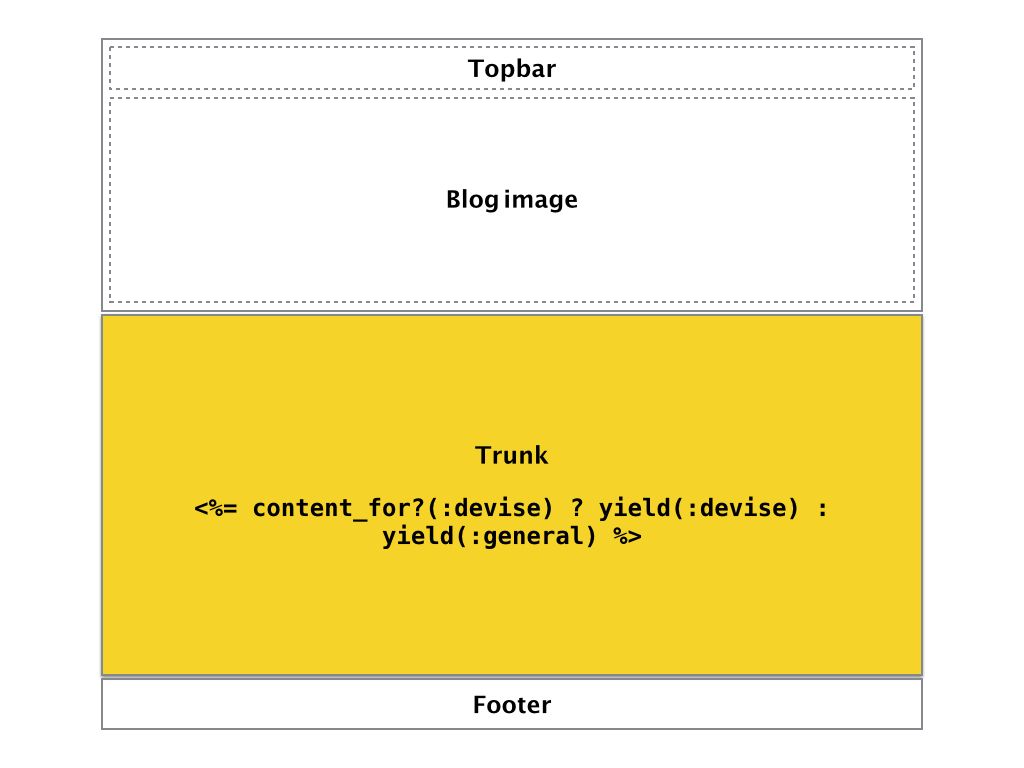
두개의 컨트롤러(devise 컨트롤러 및 posts 컨트롤러) 각각에 대해서 컨트롤러 전용 레이아웃 파일을 생성 한다. 이 때 중첩 레이아웃 기법을 사용한다. 즉, 특정 컨트롤러 레이아웃에 삽입할 내용을 content_for 메소드로 작성하여 애플리케이션 레이아웃에 추가한다. 결과적으로 애플리케이션 레이아웃에 <%= content_for?(:devise) ? content_for(:devise) : content_for(:general) %>와 같은 ERB 표현식의 실행 결과가 삽입된다.
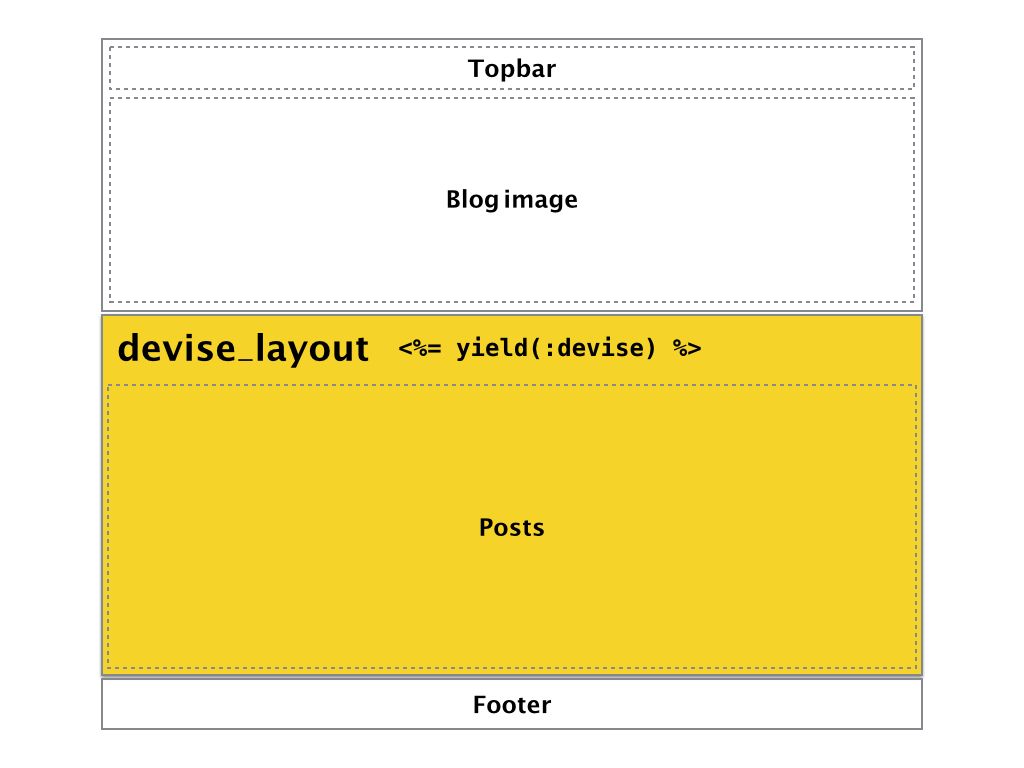
[devise 컨트롤러 전용 레이아웃] (app/views/layouts/devise_layout.html.erb)
<!-- Section for Devise layouts -->
<%= content_for :devise do %>
<div class='row'>
<div class='medium-6 columns medium-centered'>
<%= render partial: "shared/flash_messages", flash: flash %>
<div style='margin:2em 0 5em;'>
<%= yield %>
</div>
</div>
</div>
<% end %>
<!-- Section for Applictiona Layout -->
<%= render template: 'layouts/application' %>
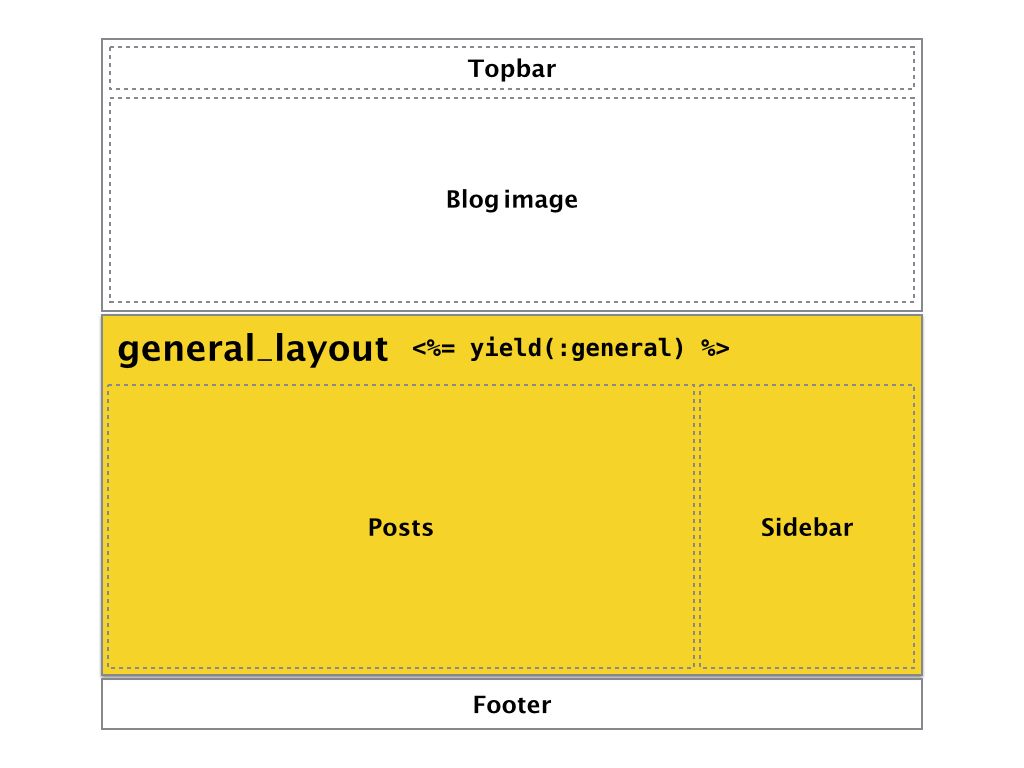
[devise를 제외한 모든 컨트롤러를 위한 레이아웃] (app/views/layouts/general_layout.html.erb)
<!-- Section for General layouts -->
<% if @posts.nil? %>
<% @posts = Post.all %>
<% end %>
<%= content_for :general do %>
<div class='row'>
<div class='large-9 medium-9 columns'>
<div class='row'>
<div class='medium-12 columns'>
<%= render partial: "shared/flash_messages", flash: flash %>
<%= yield %>
</div>
</div>
</div>
<div class='medium-3 columns' style="margin-top: 1em">
<div class='row'>
<div class='medium-12 columns'>
<p>Recent Posts :</p>
<ul>
<% @posts.each do | post | %>
<li><%= link_to truncate(post.title, length: 16), post_path(post) %></li>
<% end %>
</ul>
<hr>
<center>
<% if user_signed_in? %>
<%= link_to 'New Post', new_post_path, class: 'button small' %>
<% else %>
<%= link_to 'Sign in', new_user_session_path, class: 'button small' %>
<% end %>
</center>
</div>
</div>
</div>
</div>
<% end %>
<%= render template: 'layouts/application' %>
위에서 사용한 이미지 파일은 여기에서 다운로드 받는다.
[애플리케이션 레이아웃]
<!DOCTYPE html>
<html lang="en">
<head>
<meta charset="utf-8"/>
<meta name="viewport" content="width=device-width, initial-scale=1.0"/>
<title><%= content_for?(:title) ? yield(:title) : "FoundBlog v2.0" %></title>
<%= stylesheet_link_tag 'application', media: 'all', 'data-turbolinks-track' => true %>
<%= javascript_include_tag 'application', 'data-turbolinks-track' => true %>
<%= favicon_link_tag 'favicon.ico' %>
<%= csrf_meta_tags %>
</head>
<body>
<div class="title-bar" data-responsive-toggle="foundblog-menu" data-hide-for="medium">
<button class="menu-icon" type="button" data-toggle></button>
<div class="title-bar-title">Menu</div>
</div>
<div class="top-bar" id="foundblog-menu">
<div class="top-bar-left">
<ul class="menu">
<li class="menu-text">Found<i>Blog</i>
</li>
<li>
<a href="/">HOME</a>
</li>
<li><%= link_to "Archives", '#' %></li>
<li><%= link_to "Readme", '#' %></li>
</ul>
</div>
<div class="top-bar-right">
<ul class="dropdown menu" data-dropdown-menu>
<% if user_signed_in? %>
<li>
<a href="#"><%= current_user.email %></a>
<ul class="menu">
<li><%= link_to "My Profile", edit_user_registration_path %></li>
<li><%= link_to "Roles : " + user_roles(current_user), '#' %></li>
<li><%= link_to "Sign out", destroy_user_session_path, method: :delete, data: { confirm: "Are you sure?" } %></li>
</ul>
</li>
<% else %>
<li><%= link_to "Sign in", new_user_session_path %></li>
<li><%= link_to "Sign up", new_user_registration_path %></li>
<% end %>
</ul>
</div>
</div>
<div id="blog-banner">
<%= image_tag 'blog_header.png', width: '100%' %>
</div>
<%= content_for?(:devise) ? yield(:devise) : yield(:general) %>
<div class='row column'>
<div id='footer'>
<p>Copyright® 2016, FoundBlog, RORLAB, All rights reserved.</p>
</div>
</div>
</body>
</html>
이와 같이 컨트롤러 전용 레이아웃을 작성할 때 중첩 레이아웃 기법을 이용하면 애플리케이션 레이아웃을 포함하면서 컨트롤러별 레이아웃을 중첩해서 작성할 수 있게 된다.
레이아웃에 사용할 이미지는 아래의 이미지를 다운로드 받아 app/assets/images/ 디렉토리에 blog_header.png 파일명으로 저장하면 된다. 
아래의 예를 보자. devise 컨트롤러를 사용할 때는 하나의 컬럼으로 레이아웃를 구성할 것이고, 나머지 모든 컨트롤러에 대해서는 sidebar 컬럼을 추가해서 2개의 컬럼을 가지도록 디자인할 때, app/views/layouts/ 디렉토리에 devise_layout.html.erb 파일과 general_layout.html.erb 파일을 생성하여 각각 아래와 같이 작성한다.
devise_layout.html.erb와 general_layout.html.erb에서와 같이 flash 메시지를 표시하기 위해 app/helpers/application_helper.rb 파일을 열고 아래와 같이 헬퍼 메소드를 추가한다. 레일스는 이와 같이 헬퍼 메소드를 작성해서 뷰 파일을 리팩토링할 수 있도록 지원한다. 전체 애플리케이션내의 모든 뷰 파일에서 사용하고자 할 때는 헬퍼 메소드를 app/helpers/application_helper.rb 파일에 정의해 두면 된다
module ApplicationHelper
def bootstrap_class_for(flash_type)
# Foundation 6 : Color symbol
# 'primary', 'secondary', 'success', 'alert', and 'warning'
case flash_type
when "success"
"success" # Green
when "error"
"warning" # Yellow
when "alert"
"alert" # Red
when "notice"
"primary" # Blue
else
flash_type.to_s
end
end
def active_menu(target_controller)
"class=#{controller_name == target_controller ? 'active' : ''}"
end
def user_email(post)
post.user.present? ? post.user.email : "an anonymous user"
end
def user_roles(user)
user.roles.map(&:name).join(', ').titleize
end
end
그리고 app/views/shared/ 디렉토리에 파셜 템플릿 파일 _flash_messages.html.erb 파일을 생성하고 위에서 정의한 bootstrap_class_for 헬퍼 메소드를 이용하여 아래와 같이 작성한다.
<% flash.each do |type, message| %>
<div class="<%= bootstrap_class_for(type) %> callout" data-closable>
<button class="close-button" aria-label="Dismiss alert" type="button" data-close>
<span aria-hidden="true">×</span>
</button>
<p><%= message %></p>
</div>
<% end %>
이제 컨트롤러에 따라 레이아웃을 변경하기 위해서 application_controller.rb 파일에 아래와 같이 layout 메소드를 추가한다.
class ApplicationController < ActionController::Base
# Prevent CSRF attacks by raising an exception.
# For APIs, you may want to use :null_session instead.
protect_from_forgery with: :exception
layout :dynamic_layout
def authority_forbidden(error)
Authority.logger.warn(error.message)
redirect_to request.referrer.presence || root_path, :alert => 'You are not authorized to complete that action.'
end
private
def dynamic_layout
devise_controller? ? 'devise_layout' : 'general_layout'
end
end
devise 젬에서 제공하는 devise_controller? 라는 predicate 메소드(끝에 ?표시가 붙은 메소드로 true/false 값을 반환함)를 이용하면 우리가 목적하는 바를 쉽게 구현할 수 있다.
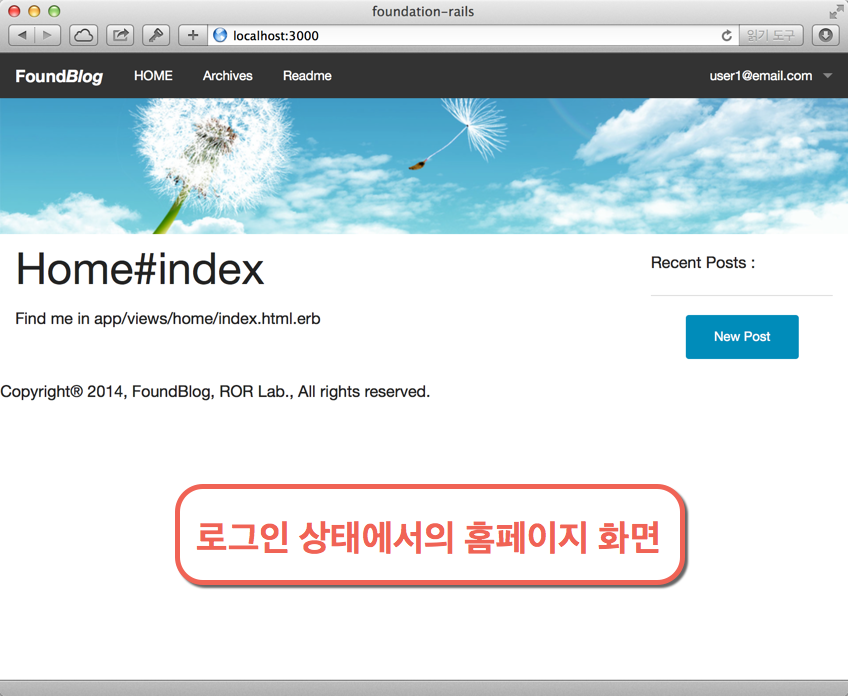
지금까지 작업한 내용에 대해서 브라우저에서 확인해 보자. 제대로 보이지 않을 경우 로컬 웹서버를 재시작할 필요가 있다.
지금까지 작업한 내용을 로컬 저장소로 커밋한다.
$ git add .
$ git commit -m "제04장 : 다이나믹 레이아웃의 작성"
$ git tag "제04장"
소스보기 https://github.com/luciuschoi/foundblog_app/tree/제04장