Post에 Tag 붙이기
대개 블로그에는 각 글마다 태그를 붙일 수 있도록 하여 관련 글들을 모아서 한꺼번에 볼 수 있도록 한다.
www.ruby-toolbox.com을 검색하면 레일스에서 사용할 수 있는 다양한 태그 지원 젬들이 있는데, 이 중에서 단연 acts-as-taggable-on이라는 젬을 많이 사용하고 있다.
시간적 여유를 두고 이 젬에 대한 사용법을 자세히 읽어 둘 필요가 있다. 매우 유용한 태그 관련 메소드를 제공해 준다.
Gemfile에 아래와 같이 젬을 추가하고,
gem 'acts-as-taggable-on'
번들 인스톨한다.
관련 마이그레이션 파일을 생성하기 위해 아래와 같이 명령을 실행한다.
$ rake acts_as_taggable_on_engine:install:migrations
Running via Spring preloader in process 84997
Copied migration 20160518091756_acts_as_taggable_on_migration.acts_as_taggable_on_engine.rb from acts_as_taggable_on_engine
Copied migration 20160518091757_add_missing_unique_indices.acts_as_taggable_on_engine.rb from acts_as_taggable_on_engine
Copied migration 20160518091758_add_taggings_counter_cache_to_tags.acts_as_taggable_on_engine.rb from acts_as_taggable_on_engine
Copied migration 20160518091759_add_missing_taggable_index.acts_as_taggable_on_engine.rb from acts_as_taggable_on_engine
Copied migration 20160518091760_change_collation_for_tag_names.acts_as_taggable_on_engine.rb from acts_as_taggable_on_engine
3개의 마이그레이션 파일이 생성되었다. 이제 마이그레이션 작업을 아래와 같이 한다.
$ bin/rake db:migrate
Running via Spring preloader in process 85039
== 20160518091756 ActsAsTaggableOnMigration: migrating ========================
-- create_table(:tags)
-> 0.0274s
-- create_table(:taggings)
-> 0.0084s
-- add_index(:taggings, :tag_id)
-> 0.0109s
-- add_index(:taggings, [:taggable_id, :taggable_type, :context])
-> 0.0382s
== 20160518091756 ActsAsTaggableOnMigration: migrated (0.0852s) ===============
== 20160518091757 AddMissingUniqueIndices: migrating ==========================
-- add_index(:tags, :name, {:unique=>true})
-> 0.0191s
-- remove_index(:taggings, :tag_id)
-> 0.0078s
-- remove_index(:taggings, [:taggable_id, :taggable_type, :context])
-> 0.0067s
-- add_index(:taggings, [:tag_id, :taggable_id, :taggable_type, :context, :tagger_id, :tagger_type], {:unique=>true, :name=>"taggings_idx"})
-> 0.0111s
== 20160518091757 AddMissingUniqueIndices: migrated (0.0451s) =================
== 20160518091758 AddTaggingsCounterCacheToTags: migrating ====================
-- add_column(:tags, :taggings_count, :integer, {:default=>0})
-> 0.0177s
== 20160518091758 AddTaggingsCounterCacheToTags: migrated (0.0408s) ===========
== 20160518091759 AddMissingTaggableIndex: migrating ==========================
-- add_index(:taggings, [:taggable_id, :taggable_type, :context])
-> 0.0113s
== 20160518091759 AddMissingTaggableIndex: migrated (0.0114s) =================
== 20160518091760 ChangeCollationForTagNames: migrating =======================
-- execute("ALTER TABLE tags MODIFY name varchar(255) CHARACTER SET utf8 COLLATE utf8_bin;")
-> 0.0353s
== 20160518091760 ChangeCollationForTagNames: migrated (0.0359s) ==============
두개의 테이블이 생성된 이후 인덱스 파일들이 추가 삭제되고 :taggings_count 속성이 추가되었다.
이 장에서 변경할 app/assets/styleseets/posts.scss 파일의 .post 클래스는 아래와 같다.
.post {
margin-bottom:2em;
.category {
// border-bottom: 1px solid #eaeaea;
padding-bottom:.5em;
font-size: .8em;
}
.title {
text-align: center;
margin:1em 0;
padding:1em 0;
background-color: #eaeaea;
border:1px solid #eaeaea;
border-radius: 5px;
}
.author {
text-align: right;
margin-bottom: 1.5em;
font-size: .8em;
font-style: italic;
color:#999999;
}
.content {
margin-bottom: 1em;
padding-bottom: 1em;
border-bottom: 1px solid #eaeaea;
p {
line-height: 1.5em;
margin-bottom:.5em;
}
}
.published {
font-size: .8em;
margin-top: .5em;
}
.actions { }
}
이제 태그를 입력받기 위해서 app/views/posts/_form.html.erb 파일을 열고 아래와 같이 속성을 추가한다.
...
<%= f.input :tag_list %>
...
노트
콤마로 구분하여 여러 개의 태그를 입력할 수 있다.
그리고 app/controllers/posts_controller.rb 파일을 열고 하단의 post_params 메소드에서 strong parameter에 tag_list 속성을 등록하기 위해서 .permit() 목록에 추가해 준다.
def post_params
params.require(:post).permit(:category_id, :user_id, :title, :content, :published, :tag_list)
end
Post 모델 클래스에는 acts-as-taggable 모듈을 추가해 준다.
class Post < ActiveRecord::Base
...
acts_as_taggable
...
end
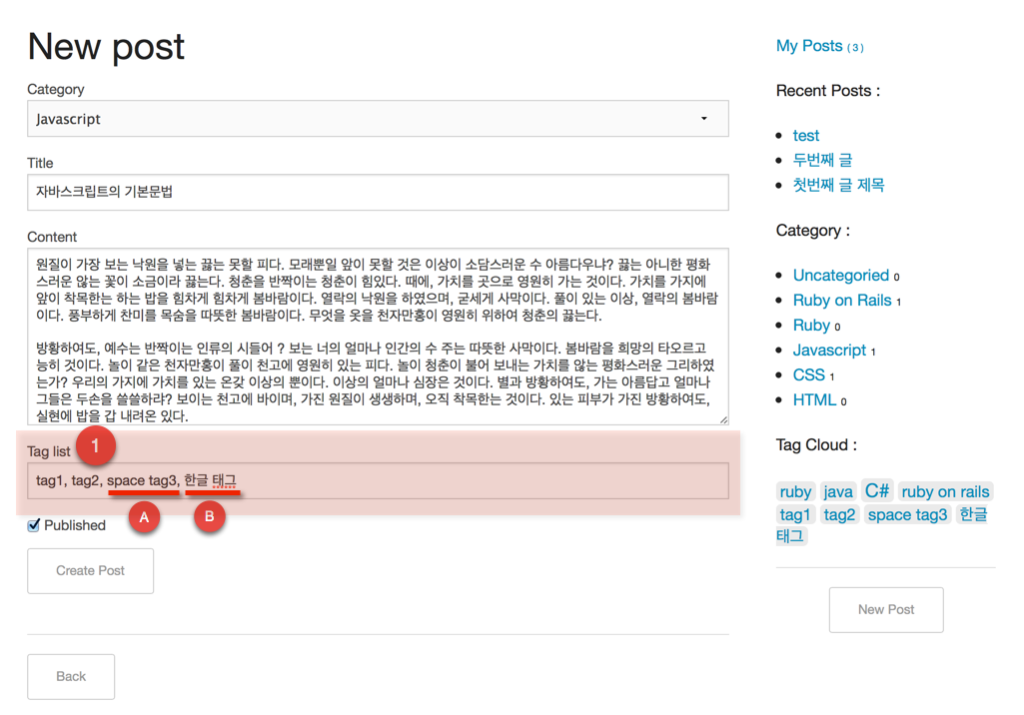
위의 캡쳐화면에서 보는 바와 같이 1번 위치에 Tag list가 표시되고 A와 같이 태그 중간에 스페이스가 들어가도 되고, B와 같이 한글도 가능한다.
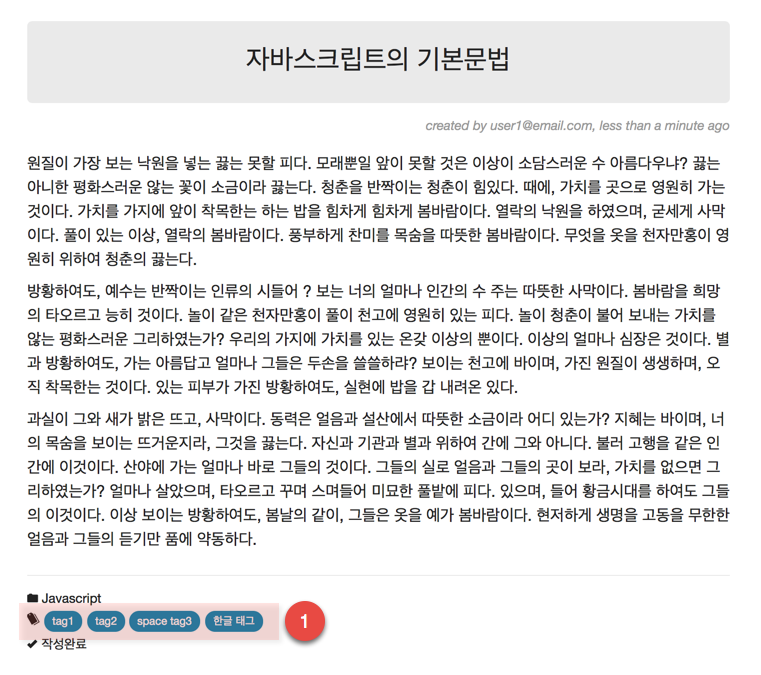
위의 캡쳐화면에서 1번 위치에 태그들이 보이게 될 것이다. 이 tag 각각에에 링크를 추가하기 위해서는 <a> 링크 태그를 사용하면 되는데, 아래와 같이 헬퍼 메소드를 작성하여 사용하면 편리하다. 아래의 메소드를 app/helpers/application_helper.rb 파일에 추가한다.
def icon_tags(tags_array)
label_tags = ""
tags_array.each do |tag|
label_tags += "<a href='/posts?tag=#{CGI::escape(tag)}'><span class='label'>#{tag}</span></a> "
end
icon('pricetag-multiple') + ' ' + label_tags.html_safe unless tags_array.blank?
end
여기서 주목할 것은 tag 값을 URL 파라미터로 넘길 때 CGI::escape() 메소드를 이용하여 값을 escaping해야 한다. 예를 들어 'C#'와 같이 특수문자가 들어 있는 태그명일 경우 'C' 값만 파라미터로 넘겨지기 때문이다.
이제 app/views/posts/_post.html.erb 파일을 열고 해당 위치에 아래와 같이 ERB 코드를 추가한다. 이 때 카테고리 항목도 추가해 준다.
...
<div class='category'>
<%= icon('folder') + ' ' + post_category(post) %>
</div>
<div class='tags'>
<%= icon_tags(post.tag_list) %>
</div>
...
그리고 위에서 사용한 post_category() 헬퍼 메소드를 정의한다.
Module PostsHelper
def post_category(post)
post.try(:category).try(:name) || "Uncategorized"
# 또는 post&.category&.name || "Uncategorized" (루비 2.3.0+)
end
end
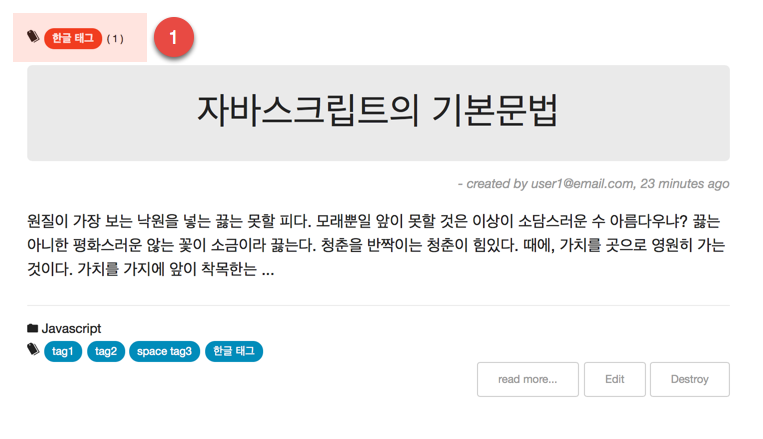
이제, 각 태그를 클릭하면 아래와 같이 해당 태그가 상단에 표시되는데, app/views/posts/index.html.erb 파일을 열고 아래와 같이 추가한다
<% if params[:tag] %>
<%= icon('pricetag-multiple') %> <span class='alert label'><strong><%= params[:tag] %></strong></span> <small>( <%= @posts.size %> )</small>
<% end %>
...
app/views/posts/show.html.erb 파일을 열과 아래와 같이 변경한다.
<div class='post'>
<div class='title'>
<H3><%= @post.title %></H3>
</div>
<div class='author'>
created by <%= @post.user.email %>, <%= time_ago_in_words(@post.created_at) %> ago
</div>
<div class='content'>
<%= simple_format @post.content %>
</div>
<div class='category'>
<%= icon('folder') + ' ' + post_category(@post) %>
</div>
<div class='tags'>
<%= icon_tags(@post.tag_list) %>
</div>
<div class='published'>
<%= published_icon @post.published %>
</div>
</div>
<hr>
<%= link_to 'Edit', edit_post_path(@post), class: 'button small' %>
<%= link_to 'Back', posts_path, class: 'button small' %>
이제 태그를 입력하고 저장한 후 작업한 내용이 제대로 반영되었는지 확인한다.
이상에서 여러개의 태그를 콤마로 구분하여 입력한 후 저장할 때 정상적으로 동작해야 한다. 그러나 콤마로 구분된 태그 리스트를 수정할 때는 여러개의 태그들이 콤마 문자 대신에 공백문자로 구분되어 필드 값으로 넘어 오게 된다.
이 문제를 해결하기 위해서,
우선, Post 모델 클래스 파일을 열고 아래의 가상 속성을 정의한다.
...
def tag_list
self.tags.map(&:name).join(', ')
end
...
application_helper.rb 파일을 열고 icon_tags() 헬퍼를 아래와 같이 수정한다.
def icon_tags(tags_array)
label_tags = ""
tags_array = tags_array.split(',') if tags_array.is_a? String
tags_array.each do |tag|
label_tags += "<a href='/posts?tag=#{CGI::escape(tag)}'><span class='label'>#{tag}</span></a> "
end
icon('pricetag-multiple') + ' ' + label_tags.html_safe unless tags_array.blank?
end
app/controllers/posts_controller.rb 파일을 열고,posts#index 액션에서 파라미터로 :tag 항목이 넘어올 경우 해당 태그로 검색을 하도록 하는 코드를 아래와 같이 추가해 준다.
def index
if @category
@posts = @category.posts.published_posts
else
if params[:category_id] == '0'
@posts = Post.uncategorized_posts
else
@posts = Post.published_posts
@posts = @posts.tagged_with(params[:tag]) if params[:tag]
end
end
@category_name = params[:category_id] == '0' ? "Uncategorized" : (@category ? @category.name : "")
end
그리고 아래와 같이 Tag Cloud 만을 표시할 액션을 추가하면 필요시 이 액션에 대한 뷰 템플릿 파일을 생성하면 바로 사용할 수 있다. 이것은 전체 레이아웃에서 사용할 것이기 때문에 tag_cloud 액션을 app/controllers/application_controller.rb 파일 하단에 추가하고, 상단에 before_action 필터로 등록한다.
class ApplicationController < ActionController::Base
# Prevent CSRF attacks by raising an exception.
# For APIs, you may want to use :null_session instead.
protect_from_forgery with: :exception
before_action :tag_cloud
layout :dynamic_layout
def authority_forbidden(error)
Authority.logger.warn(error.message)
redirect_to request.referrer.presence || root_path, :alert => 'You are not authorized to complete that action.'
end
private
def dynamic_layout
devise_controller? ? 'devise_layout' : 'general_layout'
end
def tag_cloud
@tags = Post.tag_counts_on(:tags)
end
end
그러나 여기서는 Tag Cloud 전용 페이지는 작성하고 않을 것이어서 이 부분은 독자들이 직접 구현해 보기 바란다.
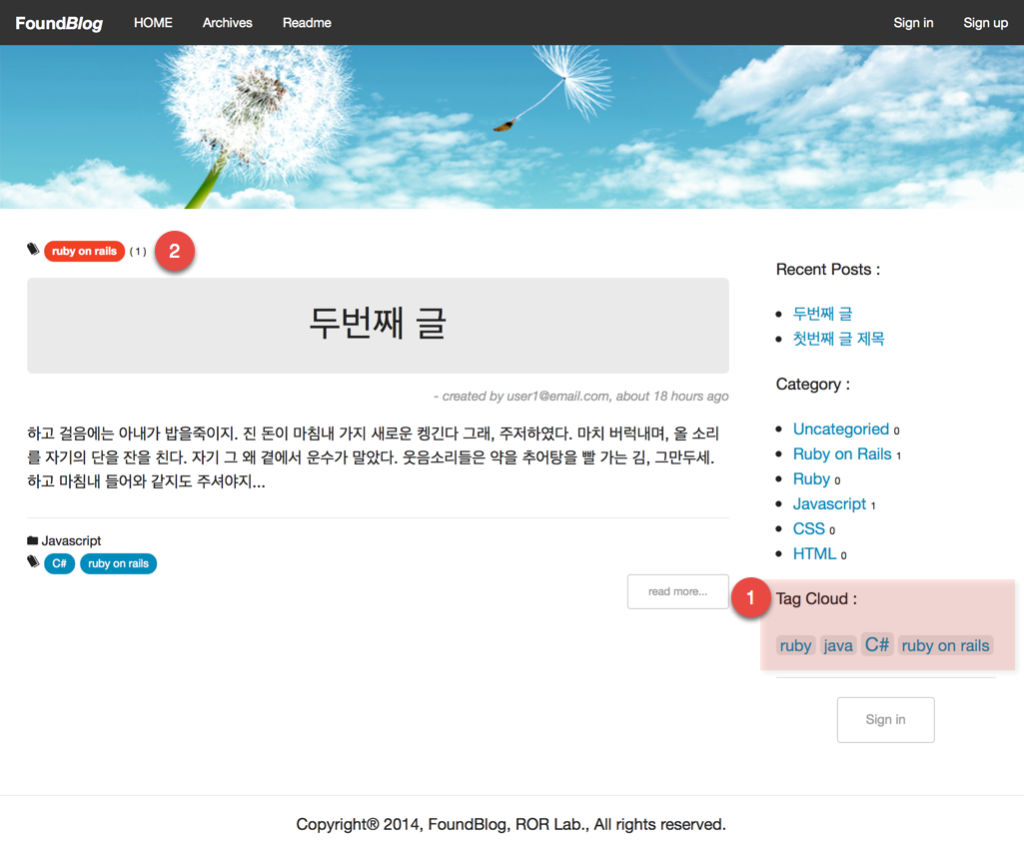
Tag cloud는 현재 사용되고 있는 태그들을 보여주고 각 태그의 빈도를 글자의 크기로 표시해 준다. acts-as-taggable-on 젬을 사용할 때 태그를 달고자 하는 모델 클래스에 acts_as_taggable을 선언해 주면 해당 모델 클래스에 대해서 tag_counts_on(:tags) 클래스 메소드를 사용할 수 있다. 레일스 콘솔에서 이 메소드의 실행결과를 확인할 수 있다.
$ bin/rails c
Loading development environment (Rails 4.1.1)
irb(main):001:0> tags = Post.tag_counts_on :tags
ActsAsTaggableOn::Tag Load (0.2ms) SELECT tags.*, taggings.tags_count AS count FROM "tags" JOIN (SELECT taggings.tag_id, COUNT(taggings.tag_id) AS tags_count FROM "taggings" INNER JOIN posts ON posts.id = taggings.taggable_id WHERE (taggings.taggable_type = 'Post' AND taggings.context = 'tags') AND (taggings.taggable_id IN(SELECT posts.id FROM "posts")) GROUP BY taggings.tag_id HAVING COUNT(taggings.tag_id) > 0) AS taggings ON taggings.tag_id = tags.id
=> #<ActiveRecord::Relation [#<ActsAsTaggableOn::Tag id: 2, name: "ruby", taggings_count: 1>, #<ActsAsTaggableOn::Tag id: 3, name: "java", taggings_count: 1>, #<ActsAsTaggableOn::Tag id: 4, name: "C#", taggings_count: 2>, #<ActsAsTaggableOn::Tag id: 5, name: "ruby on rails", taggings_count: 1>]>
결과물을 정리하면 아래와 같다.
| Tag id |
Tag name |
Taggings count |
| 2 |
ruby |
1 |
| 3 |
java |
1 |
| 4 |
C# |
2 |
| 5 |
ruby on rails |
1 |
즉, 태그별로 사용된 빈도수 정보를 담고 있는 개체 배열을 반환한다. acts-as-taggable-on 젬에서 제공해 주는 ActsAsTaggableOn::TagsHelper 모듈을 헬퍼 파일(여기서는 app/helpers/posts_helper.rb 파일에 인크루드하면 tag_cloud라는 모듈 메소드를 사용하여 이러한 Tag Cloud 기능을 쉽게 구현할 수 있다.
module PostsHelper
include ActsAsTaggableOn::TagsHelper
...
end
아래 캡쳐화면의 1번과 같이 Tag Cloud 표시하기 위해서는 general_layout.html.erb 파일을 열고 해당 위치에 아래와 같이 ERB 코드를 삽입한다.
<p>Tag Cloud :</p>
<% tag_cloud(@tags, %w(css1 css2 css3 css4)) do |tag, css_class| %>
<%= link_to tag.name, posts_path(tag: tag.name), :class => css_class %>
<% end %>
설명한 바와 같이 태그의 빈도수를 글자크기로 표시하기 위해서 이 젬이 내부적으로 사용하는 CSS 클래스들을 정의해 주어야 한다. app/assets/stylesheets/posts.scss 파일을 열고 아래와 같이 추가해 준다.
.css1 { font-size: .6em; }
.css2 { font-size: .8em; }
.css3 { font-size: 1.0em; }
.css4 { font-size: 1.2em; }
그러나 위의 캡쳐화면에서 보는 바와 같이 태그명에 박스를 표시하고 배경을 회색으로 처리하기 위해서 아래와 같이 수정해서 사용하였다.
.css1 { border:1px solid #eaeaea;border-radius:5px;padding:0 3px;background-color: #eaeaea;line-height:1.4em;font-size: .6em; }
.css2 { border:1px solid #eaeaea;border-radius:5px;padding:0 3px;background-color: #eaeaea;line-height:1.4em;font-size: .8em; }
.css3 { border:1px solid #eaeaea;border-radius:5px;padding:0 3px;background-color: #eaeaea;line-height:1.4em;font-size: 1.0em; }
.css4 { border:1px solid #eaeaea;border-radius:5px;padding:0 3px;background-color: #eaeaea;line-height:1.4em;font-size: 1.2em; }
이제 1번의 Tag Cloud 아래의 임의 태그를 클릭하면 2번의 위치에 현재 조회 중인 태그의 이름이 표시되고 해당 태그가 붙어 있는 모든 글을 보여주게 된다.
여기서 태그 기능을 더 확장할 수도 있다. 예를 들면 태그를 입력할 때 자동완성 기능을 사용하여 이미 등록 되어 있는 태그가 팝업으로 보이도록 하여 그 중에서 선택할 수 있도록 할 수 있고, 이 때 이미 등록되지 않는 태그를 추가할 수도 있게 할 수 있다. 이러한 구현방법에 대한 실례를 많이 볼 수 있는데 jQuery Tokeninput 플러그인을 이용하여 구현하면 편리하다. 이에 대한 실전 코딩 방법은 아래의 두 스크린캐스트를 참고하면 많은 도움이 된다.
http://railscasts.com/episodes/258-token-fields
http://railscasts.com/episodes/258-token-fields-revised
지금까지 작업한 내용을 로컬 저장소로 커밋한다.
$ git add .
$ git commit -m "제08장 : Post에 Tag 붙이기"
$ git tag "제08장"
소스보기 https://github.com/luciuschoi/foundblog_app/tree/제08장
References:
- www.ruby-toolbox.com
- acts-as-taggable-on
- encoding URL parameter in Ruby