사용자 권한 설정하기
"Gemfile의 작성"에서 Gemfile에 rolify와 authority 젬을 포함했었다.
이제 본격적으로 권한 설정 부분을 구현해 보기로 한다.
우선 사용자 Role을 설치하자. rolify 젬 매뉴얼에는 $ rails g rolify Role User로 명령을 실행하도록 되어 있지만 이미 User 모델이 생성되어 마이그레이션된 상태이므로 User 파라미터는 아래와 같이 생략한다.
$ rails g rolify Role
      invoke  active_record
      create    app/models/role.rb
      invoke    test_unit
      create      test/models/role_test.rb
      create      test/fixtures/roles.yml
      insert    app/models/role.rb
      create    db/migrate/20140604030951_rolify_create_roles
      insert  app/models/user.rb
      create  config/initializers/rolify.rb
===============================================================================

An initializer file has been created here: config/initializers/rolify.rb, you
can change rolify settings to match your needs.
Defaults values are commented out.

A Role class has been created in app/models (with the name you gave as
argument otherwise the default is role.rb), you can add your own business logic
inside.

Inside your User class (or the name you gave as argument otherwise the default
is user.rb), rolify method has been inserted to provide rolify methods.
현재 설치된 rolify 젬 버전은 3.4.0인데 아래와 같이 마이그레이션 상태를 확인할 때 에러가 발생하여 젬 오류임을 알게되었다.
$ rake db:migrate:status
[WARN] table 'Role' doesn't exist. Did you run the migration ? Ignoring rolify config.

database: /Users/hyo/prj/r4/auth_blog/db/development.sqlite3

 Status   Migration ID    Migration Name
--------------------------------------------------
   up     20140528023115  Devise create users
   up     20140528082305  Create posts
즉, 생성된 마이그레이션 파일의 확장자가 누락되어 있다. 분명히 마이그레이션 파일이 생성되었는데도 불구하고 마이그레이션 상태에서 해당 Migration ID가 찾을 수가 없어서 확인해 본 결과 발견하게 되었다.
create db/migrate/20140529072028_rolify_create_roles
실제 생성된 파일명에 .rb 확장자가 없다. 해결방법은 확장자를 추가후에 db:migrate하면 된다.
$ rake db:migrate
[WARN] table 'Role' doesn't exist. Did you run the migration ? Ignoring rolify config.
== 20140529072028 RolifyCreateRoles: migrating ================================
-- create_table(:roles)
   -> 0.0045s
-- create_table(:users_roles, {:id=>false})
   -> 0.0002s
-- add_index(:roles, :name)
   -> 0.0003s
-- add_index(:roles, [:name, :resource_type, :resource_id])
   -> 0.0004s
-- add_index(:users_roles, [:user_id, :role_id])
   -> 0.0002s
== 20140529072028 RolifyCreateRoles: migrated (0.0059s) =======================
[WARN] 메시지가 보이지만 일단 무시해도 된다.
다음은, 실제 권한 설정을 위한 Authority를 설치하자.
$ rails g authority:install
      create  app/authorizers
      create  app/authorizers/application_authorizer.rb
      create  config/initializers/authority.rb
      create  public/403.html

Install complete! See the README on Github for instructions on getting your
app running with Authority.
이로써 설치과정을 완료하였다.
이제부터는 실제 사용법을 알아보자. 우선을 가정을 해 보자. 당연한 것이지만, "본인이 작성한 글만 수정하거나 삭제할 수 있다" 정도로 설정하면 되겠다.
우선, 권한을 설정하고자 하는 모델 클래스에 resourcify을 선언해 주어야 한다. 여기서는 Post 모델 클래스 파일(app/models/post.rb)에 지정하면 된다.
class Post < ActiveRecord::Base
  resourcify
  belongs_to :user
end
그리고 일단은 User 모델 클래스에 아래와 같이 include Authority:UserAbilities를 추가해 준다. (app/models/user.rb)
class User < ActiveRecord::Base
  rolify
  include Authority::UserAbilities
  # Include default devise modules. Others available are:
  # :confirmable, :lockable, :timeoutable and :omniauthable
  devise :database_authenticatable, :registerable,
         :recoverable, :rememberable, :trackable, :validatable
  has_many :posts, dependent: :destroy
end
이로써 current_user.can_update? 또는 current_user.can_delete?와 같은 메소드를 사용할 수 있게 된다.
다시 Post 모델 클래스에는 아래와 같이 include Authority::Abilities를 추가해 준다.
class Post < ActiveRecord::Base
  resourcify
  include Authority::Abilities

  belongs_to :user
end
이로써 @post.updatable_by? 또는 @post.deletable_by?와 같은 메소드를 사용할 수 있게 된다.
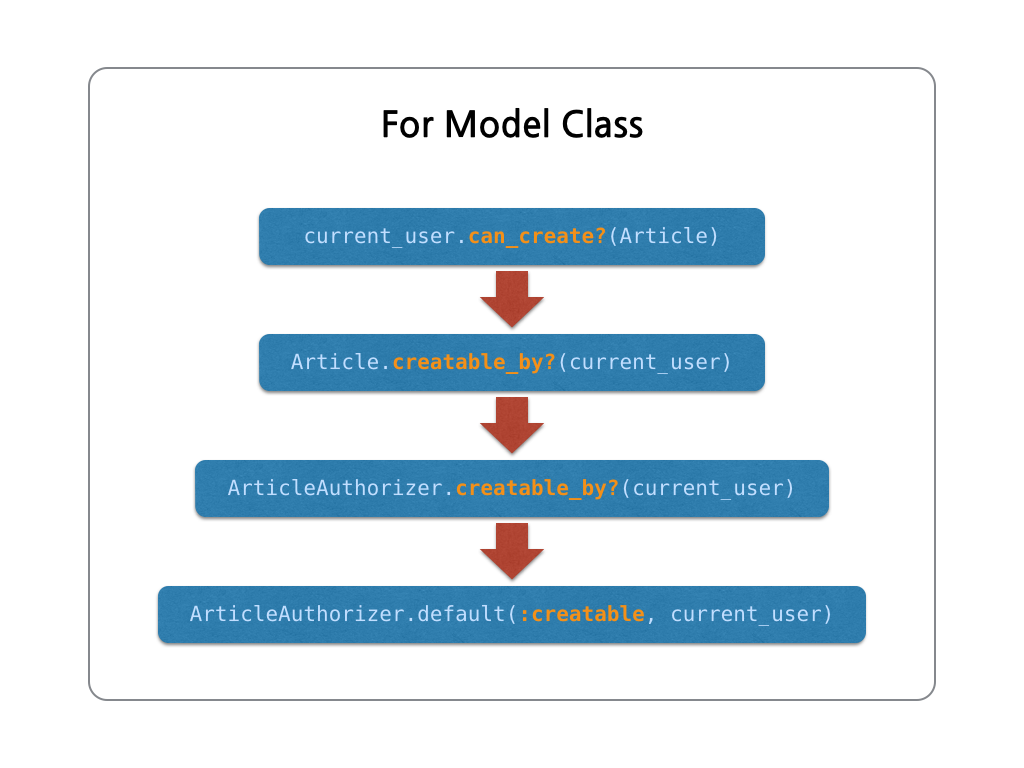
즉, 동사형과 형용사형의 권한 메소드를 사용할 수 있게 되는 것이다. @post.updatable_by?(current_user)와 current_user.can_update?(@post)는 동일한 기능을 하게 된다.
이와 같은 동사형과 형용사형의 권한 메소드는 아래와 같은 플로우에 따라서 실행된다.
[모델 클래스에 대한 권한 메소드의 실행 순서]
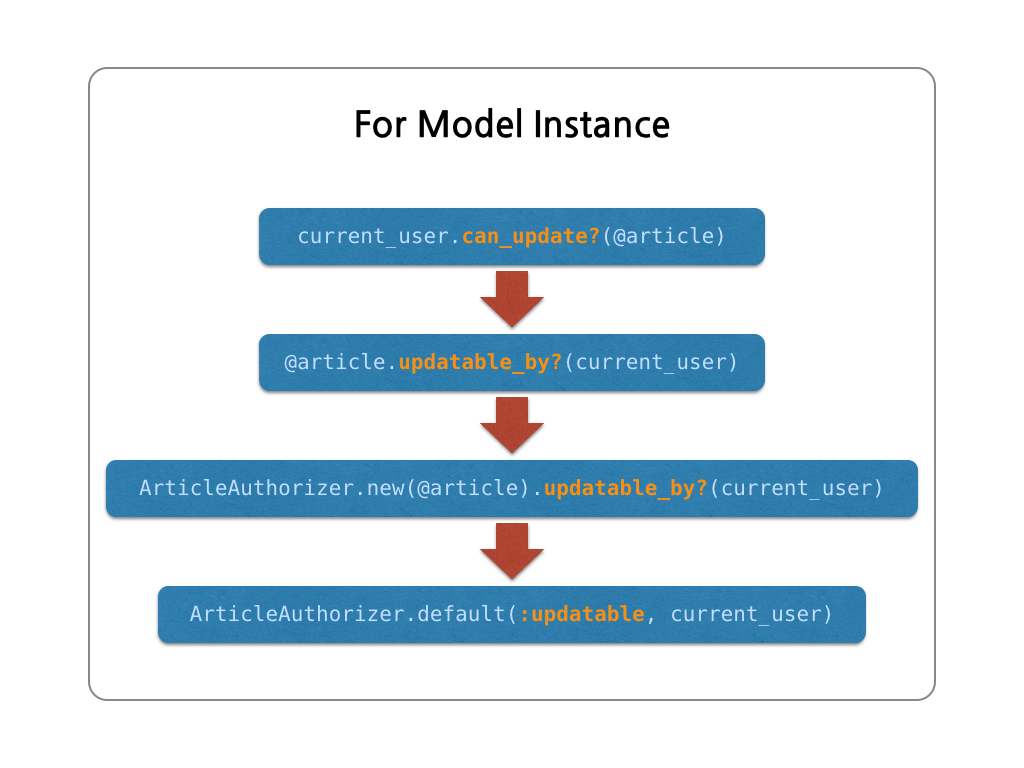
[모델 객체 인스턴스에 대한 권한 메소드의 실행 순서]
가장 최상위의 권한은 ApplicationAuthorizer 클래스에서 정의한다. 이 클래스 파일(app/authorizers/application_authorizer.rb)을 열고 우선은 rolify의 기능을 사용하지 않은 채, 아래와 같이 작성한다.
class ApplicationAuthorizer < Authority::Authorizer

  def self.default(adjective, user)
    false
  end

  def updatable_by?(user)
    resource.user == user
  end

  def deletable_by?(user)
    resource.user == user
  end

end
그리고 posts 컨트롤러의 :edit, :update, :destroy 액션 시작부분에 아래와 같이 authorize_action_for @post를 추가해 준다.
def edit
  authorize_action_for @post
end
다음은 app/views/posts/index.html.erb 파일을 열어서 아래와 같이 권한을 확인하는 코드를 추가한다.
<%= link_to icon('eye-open'), post %>
<% if user_signed_in? %>
<%= link_to icon('edit'), edit_post_path(post) if post.updatable_by? current_user %>
<%= link_to icon('trash'), post, method: :delete, data: { confirm: 'Are you sure?' } if post.deletable_by? current_user %>
<% end %>
즉, 현재 로그인한 사용자가 해당 post에 대한 수정 및 삭제 권한이 있는 경우에는 링크를 보여주도록 한다.
icon('eye-open') 헬퍼메소드는 app/helpers/applicaiton_helper.rb 파일에 아래와 같이 정의해 둔다.
def icon(shape)
  "<span class='glyphicon glyphicon-#{shape}'></span>".html_safe
end
마지막으로 특정 액션에 대해서 권한이 없는 사용자가 접근을 하게 되면 Security Violation을 표시하는 페이지로 이동하는데 이것을 flash 메시지로 보이도록 하기 위해서 아래와 같이 application_controller.rb 파일의 ApplicationController 클래스 내에 추가한다.
# Send 'em back where they came from with a slap on the wrist
def authority_forbidden(error)
  Authority.logger.warn(error.message)
  redirect_to request.referrer.presence || root_path, :alert => 'You are not authorized to complete that action.'
end
이제 대략적인 권한설정을 완료했으므로 서버를 다시 시작한 후 브라우저 상단의 메뉴 항목 중에 Posts를 클릭해 보자.
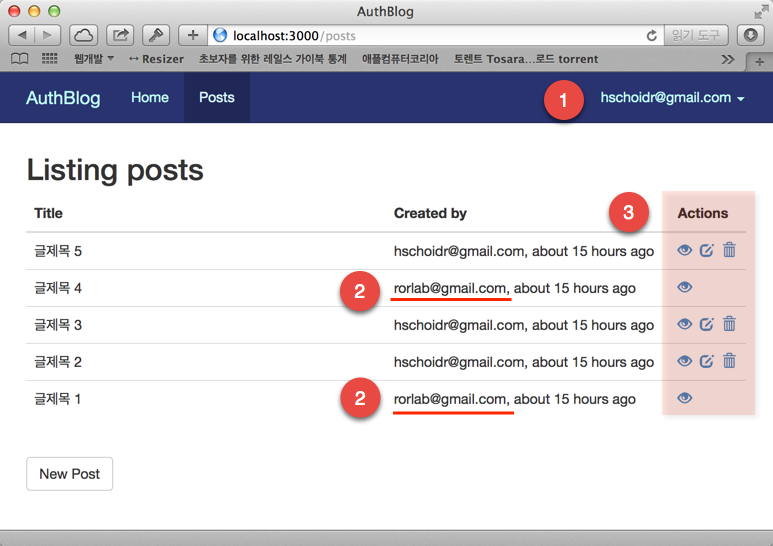
보는 바와 같이 현재 로그인하 사용자가 작성하지 않은 2번으로 표시된 글의 경우에는 Actions 패널에 edit와 destroy 아이콘 링크가 보이지 않게 된다.
실제로 2번 글의 Actions 패널에 있는 아이콘 링크를 클릭한 후 하단에 보이는 Edit 버튼을 클릭하여 아래와 같이 경고 메시지(1번)가 표시된다.

Role의 지정
지금까지는 권한 설정시에 사용자의 Role을 전혀 고려하지 않았다.
지금부터는 어떻게 사용자들에게 Role을 부여하고 권한 설정에 이용하는지를 알아보자.
이를 위해서 아래의 사항을 준비한다.
- 회원등록할 때 기본
Role(:user)을 부여한다. 이를 위해서User모델에서after_create콜백 메소드를 작성하여 추가한다. - 특정인에 대해서는
:adminRole을 부여하여 관리자로서의 모든 권한을 가지도록 한다. seed.rb 파일을 작성해서 어플리케이션이 최초로 시작할 때 미리 사용자를 추가하여 관리자 권한을 부여하도록 한다. - 마지막으로
ApplicationAuthorizer클래스에 현재 사용자의Role을 점검하도록 코드를 추가한다.
기본 Role의 추가
User 모델 클래스 파일을 열고 아래와 같이 추가한다.
class User < ActiveRecord::Base

...중략...

  after_create :set_default_role

  private

  def set_default_role
    add_role :user
  end

end
이제 새로 사용자 등록을 하면 아래와 같은 화면이 보이게 되고 1번과 같이 보이게 하면 사용자 등록 후 자동으로 추가된 Role을 확인할 수 있다.
아래에서 사용할 user_roles 헬퍼 메소드를 app/helpers/application_helper.rb 파일에 아래와 같이 미리 정의한다.
def user_roles(user)
  user.roles.map(&:name).join(',').titleize
end
Note
titleize헬퍼 메소드는 문자열의 단어의 첫글자를 대문자로 보이게 한다.
이를 위해서 어플리케이션 레이아웃(app/views/layouts/application.html.erb)의 메뉴(navbar) 중 My Profile 항목 아래에 아래의 코드를 추가한다.
<li><%= link_to "Roles : " + user_roles(current_user), '#' %></li>
관리자 계정 생성
관리자 계정은 어플리케이션이 최초로 시작할 때 자동으로 생성되도록 하면 편리하다. 어짜피 관리자 권한을 가지 사람이 최초로 웹어플리케이션을 시작하게 되므로 문제가 없다.
이를 위해서 db/seeds.rb 파일을 열어서 아래와 같이 최초 사용자를 등록하고 :admin으로 Role을 추가한다.
# 관리자 계정의 생성 및 역할지정(관리자가 생성된 후 보안상의 이유로 비밀번호는 반드시 다른 것으로 변경하기 바람.)
admin_user = User.create( name: "관리자", email: 'admin@email.com', password: '12345678', confirmed_at: Time.now )
admin_user.add_role :admin
위에서 confirmed_at 속성에 현재 시간(Time.now)을 지정하면 Devise의 :confirmable 모듈로 인한 본인 확인을 위한 이메일 발송 콜백을 피할 수 있다.
이제 터미널 커맨드라인 쉘에서 데이터베이스를 reset하자.
$ rake db:reset
그러나 실제로는 User 모델에 after_create 콜백 메소드가 정의되어 있으므로, 결과적으로 :user와 :admin 권한이 두개 추가되는 결과를 보이게 되기 때문에 이 콜백에 조건을 추가할 필요가 있다.
after_create :set_default_role, if: Proc.new { User.count > 1 }
즉, after_create 콜백이 호출되려면 최소한 등록된 사용자 수가 1개 이상이어야 한다는 것이다.
그리고 웹브라우저에서 관리자 이메일로 로그인해 보자.
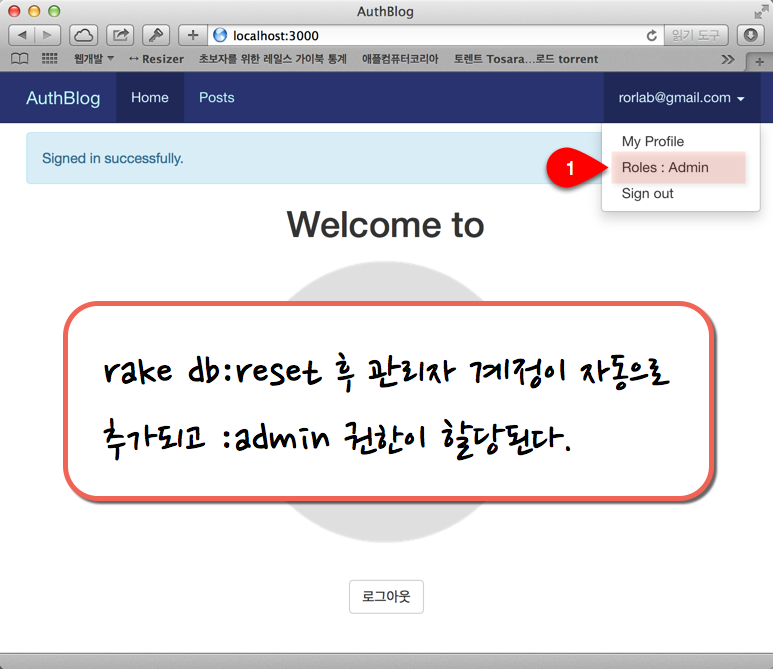
1번에서 Admin 권한 하나만 표시된 것을 확인해 볼 수 있다.
Authorizer 클래스에 Role 점검 추가하기
Role을 사용하여 권한을 설정할 때는 우선 모든 사용자가 관리자 권한을 가지는 것으로부터 시작(default 클래스 메소드)한다.
아래의 ApplicationAuthorize 클래스 코드를 보자.
class ApplicationAuthorizer < Authority::Authorizer

  def self.default(adjective, user, options={})
    user.has_role? :admin
  end

  def updatable_by?(user)
    resource.user == user || user.has_role?(:admin)
  end

  def deletable_by?(user)
    resource.user == user || user.has_role?(:admin)
  end

end
updatable_by?와 deletable_by? 인스턴스 메소드에 user.has_role?(:admin)을 추가하여 관리자는 모든 데이터를 수정하고 삭제할 수 있도록 한다.
특정 클래스에 대한 권한 로직은 해당 모델명에 Authorize를 붙인 클래스에 구현한다. 예를 들어 Post 모델의 경우는 PostAuthorize 클래스에 권한 로직을 구현한다. 그러나 모든 모델이 동일한 로직을 가진다면 부모 클래스인 ApplicationAuthorize 클래스에 이러한 권한 로직을 구현할 수 있기 때문에 여기서는 PostAuthorize 클래스를 정의할 필요가 없다. 만약 다른 모델과는 달리 권한 로직을 별도로 구현할 필요가 있을 경우에는 PostAuthorize 클래스를 구현해야 한다.
노트
:admin 권한을 추가하기 저에는 :admin 권한이 있다 하더라도 본인이 작성하지 않은 글에 대해서 수정/삭제 권한이 없었지만, 이제 :admin 권한을 가진 사용자는 모든 글에 대해서 수정/삭제 권한을 가지게 되어 Posts 목록 페이지에서도 모든 글의 Actions 아이콘들이 모두 보이게 된다.
이와 같이 Authority 젬을 사용할 때 권한 로직 구현의 방식은 크게 세가지로 구분한다.

- 단순형 : 가장 단순한 방식으로 모든 권한 로직은
ApplicationAuthorize클래스에 구현한다. - 공유형 : 하나의
Authorize클래스를 여러 모델이 공유하는 로직이다. - 개별형 : 각 모델의 권한 로직을 자신만의
Authorize클래스에 구현한다.
여기서 구현한 것은 위의 세가지 유형 중에 단순형에 해당한다. 아직 PostAuthorize 클래스 파일이 존재하지 않으므로 Post 모델은 ApplicationAuthorize 클래스의 권한 로직을 따르게 된다.
Authoriry 젬에 대한 더 자세한 설명은 여기를 참고하기 바란다.
이상으로 간단하게 Authority 젬을 이용하여 권한설정을 구현하였다.
다음은 Twitter, Facebook, LinkedIn API를 이용하여 로그인하는 방법을 소개하겠다.
References :
- nathanl/authority : https://github.com/nathanl/authority