기타 SNS 인증서비스로 로그인하기
주의
이 장에서는 구현하는 내용은 Facebook으로 로그인하기에서 작업한 내용을 포함하지 않는다는 것을 유의하기 바란다.
이전에 설명한 Facebook SNS 인증서비스만를 사용할 경우와는 달리 여러개의 인증서비스를 동시에 사용할 수 있도록 하는 것은 조금 복잡하다.
다행히도 "Kam Low"가 작성한 rails 4 omniauth using devise with twitter, facebook and linkedin라는 훌륭한 글을 검색할 수 있어서 많은 부분을 참고하였으며 약간의 코드 수정을 통해서 구현한 내용을 설명과 곁들여 정리하였다.
현재 OAuth(인증)를 제공하는 서비스가 상당히 많이 공개되어 있다. 이 중에서도 특히 Twitter는 사용자의 이메일 주소를 공개하지 않기 때문에 사용자가 본인의 이메일을 직접 입력해야 하는 예외적인 로직을 추가해 주어야 한다.
이 장에서는 Facebook 뿐만 아니라, Twitter, Linkedin, 최근에 오픈된 Kakao 인증서비스를 이용하여 로그인하는 과정을 설명한다.
노트
Kakao 인증서비스를 루비에서 사용하기 위해서는 omniauth-kakao OAuth API 젬을 사용해야 하는데, 이 젬은 강성희(@shaynekang)님이 작성하여 Rubygems.org에 공개하였다.
이제 본격적으로 구현해 보기로 하자.
우선 Gemfile에 아래와 같이 OmniAuth관련 젬들을 추가하고,
gem 'omniauth-facebook'
gem 'omniauth-twitter'
gem 'omniauth-linkedin'
gem 'omniauth-kakao'
번들 인스톨한다.
$ bundle install
다음은 User 모델 클래스에 사용자 이름을 저장할 속성을 추가하고 마이그레이션 한다.
$ rails g migration add_name_to_users name && rake db:migrate
그리고 인증서비스 제공자의 이름을 저장하기 위한 provider 속성과 해당 서비스에 등록된 사용자의 아이디를 저장할 uid 속성을 별도의 모델로 관리하기 위해서 Identity라는 모델 클래스를 생성한다.
$ rails g model Identity user:references provider uid
노트
레일스 레너레이터를 이용하여 모델을 만들 때 해당 속성이 문자열일 경우 데이터형을 생략할 수 있는데, provider:string은 데이터형 지정없이 provider만으로 파라미터를 지정해도 된다.
그리고 Facebook으로 로그인하기에서와 같이 User 모델 클래스 파일을 열어 :confirmable 옵션을 devise 매크로형 메소드에 추가해 준다. 이 옵션은 사용자 등록시 인증메일을 보낼 수 있게 해 준다.
devise :database_authenticatable, :registerable, :confirmable, :recoverable, :rememberable, :trackable, :validatable, :confirmable
이를 위해서는 아래와 같이 레일스가 이메일을 보낼 수 있도록 환경 옵션을 지정해야 한다. 편의상 Gmail의 stmp 이메일 발송 서비스를 이용하기로 한다.
config/environments/[environment].rb 파일에서 아래의 내용을 추가한다. (필요에 따라 [environment]는 development 또는 production으로 사용함.)
여기서는 개발환경에서 테스트를 할 것이기 때문에 config/environments/development.rb 파일을 열고 아래와 같이 추가해 준다.
...
  # 이메일 발송을 위한 환경 설정
  config.action_mailer.delivery_method = :smtp
  config.action_mailer.perform_deliveries = true
  config.action_mailer.default_url_options = { :host => 'localhost:3000' }
  config.action_mailer.smtp_settings = {
    address: 'smtp.gmail.com',
    port: '587',
    enable_starttls_auto: true,
    user_name: 'someuser',
    password: 'somepass',
    authentication => :plain,
    domain => 'somedomain.com'
  }
...
'user_name'과 'password'는 본인의 Gmail 계정 정보로 변경해야 한다. 그러나, 보안상 우려가 될 경우 이 정보들은 환경변수로 지정하여 사용할 수 있다. 예를 들면,
$ echo "export GMAIL_USERNAME=<account_name>" >> ~/.bashrc
$ echo "export GMAIL_PASSWORD=<account_password>" >> ~/.bashrc
Note
zsh쉘을 사용하는 경우에는~/.bashrc대신에~/.zshrc을 지정한다.
<account_name>와 <account_password>에는 실제 각자의 Gmail 계정이름과 비밀번호를 입력한다. 결과적으로 위의 지정한 이 두 값은 아래와 같이 할당하면 된다.
user_name: ENV['GMAIL_USERNAME'],
password: ENV['GMAIL_PASSWORD'],
그리고 'domain'도 운영서버에 연결되는 도메인명으로 변경하자.
Note
config/environments/production.rb파일에 추가할 때는:host => 'localhost:3000'를:host => '<somedomain.com>'으로 변경해 주어야 한다.
'letter_opener' 젬의 활용
그러나 개발시에 실제로 일일이 이메일을 발송하는 것은 여러가지 문제점을 발생시킬 수 있다. 예를 들어, 불필요한 이메일을 발송하여 자원을 낭비하는 측면과, 발송된 이메일을 메일함에서 일일이 찾아봐야 하는 불편감, 그리고, 때로는 예기치 않게 특정인에게 이메일이 실제 발송되는 등의 단점 등이 있을 수 있다.
이러한 불편한 점을 보안하기 위해서 Railscasts.com의 Ryan Bates는 letter_opener라는 젬을 만들었다. 이 젬은 실제로 이메일을 발송하는 대신 브라우저에서 이메일을 볼 수 있도록 해 준다. 또한 development.rb 파일에서 위에서 기술한 바와 같은 이메일 발송을 위한 설정을 할 필요가 없게되어 개발시 매우 편리하게 사용할 수 있다.
[사용법]
Gemfile에 아래와 같이 젬을 추가하고,
gem "letter_opener", :group => :development
번들 인스톨한다.
$ bundle install
그리고 config/environments/development.rb 파일을 열어 아래와 같이 옵션을 지정한다.
config.action_mailer.delivery_method = :letter_opener
이제부터는 이메일이 발송되면 브라우저 창이 나타나게 된다. 참고 발송된 이메일들은 tmp/letter_opener 디렉토리에 위치하게 된다.
이제 다시 Identity 모델을 생성한 이후부터 이야기를 계속 이어간다. app/models/identity.rb 모델 클래스 파일을 열고 아래와 같이 변경한다.
class Identity < ActiveRecord::Base
  belongs_to :user
  validates :uid, :provider, presence: true
  validates :uid, uniqueness: { :scope => :provider }

  def self.find_for_oauth(auth)
    identity = find_by(provider: auth.provider, uid: auth.uid)
    identity = create(uid: auth.uid, provider: auth.provider) if identity.nil?
    identity
  end
end
Identity 클래스 메소드 self.find_for_oauth()는 파라미터로 받은 auth 인수를 이용하여 provider와 uid가 일치하는 사용자를 검색해 보고 없으면 새로 identity 객체를 생성하고 이미 존재할 경우에는 해당 identity 객체를 반환한다.
다음은 app/config/initializers/devise.rb 파일을 열고 아래와 같이 사용하고자 하는 provider를 등록해 둔다.
Devise.setup do |config|
...
  config.omniauth :facebook, ENV["FB_APP_ID"], ENV["FB_APP_SECRET"]
  config.omniauth :twitter, ENV["TW_API_KEY"], ENV["TW_API_SECRET"]
  config.omniauth :linkedin, ENV["IN_API_KEY"], ENV["IN_API_SECRET"]
  config.omniauth :kakao, ENV["KAKAO_CLIENT_ID"]
...
end
각 환경변수에 대해서는 각자의 시스템에 미리 등록을 해 주어야 한다.
$ echo "export ENV["FB_APP_ID"]=xxxxxx" >> ~/.bashrc
$ echo "export ENV["FB_APP_SECRET"]=xxxxxx" >> ~/.bashrc
$ echo "export ENV["TW_API_KEY"]=xxxxxx" >> ~/.bashrc
$ echo "export ENV["TW_API_SECRET"]=xxxxxx" >> ~/.bashrc
$ echo "export ENV["IN_API_KEY"]=xxxxxx" >> ~/.bashrc
$ echo "export ENV["IN_API_SECRET"]=xxxxxx" >> ~/.bashrc
$ echo "export ENV["KAKAO_CLIENT_ID"]=xxxxxx" >> ~/.bashrc
zsh쉘을 사용하는 경우에는 ~/.bashr 대신에 ~/.zshrc를 입력하여 명령을 실행하면 된다. provider별로 인증값을 발급받을 수 있는 링크는 아래와 같다.
- Facebook : https://developers.facebook.com (Facebook으로 로그인하기를 참고하면 자세히 알 수 있다.)
- Twitter : https://apps.twitter.com 에서 오른쪽에 있는
Create New App버튼을 클릭한다. - Linkedin : https://www.linkedin.com/secure/developer 에서 바로 등록할 수 있다.
- Kakao : https://developers.kakao.com/apps
그리고 'omniauth-facebook', 'omniauth-twitter', 'omniauth-linkedin', 'omniauth-kakao' 젬 문서들을 보면 도움을 받을 수 있다.
특히, 아래와 같이 트위터 앱 등록시 Callback URL 값으로는 http://127.0.01을 입력하고 Webiste는 실제 운영서버로 연결되는 도메인명을 입력한다.

다음 config/routes.rb 파일을 열고 omniauth_callbacks에 대한 라우팅을 아래와 같이 지정해 준다.
devise_for :users, :controllers => { omniauth_callbacks: 'omniauth_callbacks' }
Devise에서 사용하는 omniauth_callbacks 컨트롤러를 app/controllers/omniauth_callbacks.rb로 지정하는 것이다.
그리고 아래와 같이 해당 컨트롤러를 작성한다.
class OmniauthCallbacksController < Devise::OmniauthCallbacksController
  def self.provides_callback_for(provider)
    class_eval %Q{
      def #{provider}
        @user = User.find_for_oauth(env["omniauth.auth"], current_user)

        if @user.persisted?
          sign_in_and_redirect @user, event: :authentication
          set_flash_message(:notice, :success, kind: "#{provider}".capitalize) if is_navigational_format?
        else
          session["devise.#{provider}_data"] = env["omniauth.auth"]
          redirect_to new_user_registration_url
        end
      end
    }
  end

  [:twitter, :facebook, :linkedin, :kakao].each do |provider|
    provides_callback_for provider
  end

  def after_sign_in_path_for(resource)
    if resource.email_verified?
      super resource
    else
      finish_signup_path(resource)
    end
  end
end
self.self.provides_callback_for 클래스 메소드에 대한 이해가 되지 않더라도 일단 넘어가자. 이 부분은 메타프로그래밍에 대한 것으로 초보자 입장에서는 당장에 이해하기가 어려울 수 있다.
여기서 고려해야 할 로직상의 문제점이 있다. 즉, Facebook으로 로그인한 사용자가 다른 이메일을 사용하는 Linkedin으로 다시 로그인할 경우 이 두 계정이 동일한 사용자의 것인지를 알 수 있는 방법이 없다. 따라서 동일한 사용자에 대해서 두개의 계정이 생성될 가능성이 있다. 이를 해결하기 위해서 위에서 작성한 User.find_for_oauth 클래스 메소드에 current_user를 파라미터로 넘겨 주는 옵션을 추가하여 현재 로그인한 사용자가 다른 provider를 이용하여 다시 로그인하더라도 동일한 사용자로 인식하고 Identity에 추가한다. 따라서 해당 사용자는 두개의 identity 객체를 가지게 되는 것이다.
다음은, User 모델 클래스에서 self.find_for_oauth 클래스 메소드를 정의하고 email_verified?라는 predicate 메소드를 정의한다. 지금까지 작성한 User 모델 클래스는 아래와 같다.
class User < ActiveRecord::Base
  rolify
  include Authority::UserAbilities

  # Include default devise modules. Others available are:
  # :confirmable, :lockable, :timeoutable and :omniauthable
  devise :database_authenticatable, :registerable, :confirmable,
         :recoverable, :rememberable, :trackable, :validatable, :omniauthable
  has_many :posts, dependent: :destroy
  has_many :identities, dependent: :destroy

  after_create :set_default_role, if: Proc.new { User.count > 1 }

  TEMP_EMAIL_PREFIX = 'change@me'
  TEMP_EMAIL_REGEX = /\Achange@me/

  validates_presence_of :name
  validates_format_of :email, :without => TEMP_EMAIL_REGEX, on: :update

  def self.find_for_oauth(auth, signed_in_resource = nil)

    # Get the identity and user if they exist
    identity = Identity.find_for_oauth(auth)

    # If a signed_in_resource is provided it always overrides the existing user
    # to prevent the identity being locked with accidentally created accounts.
    # Note that this may leave zombie accounts (with no associated identity) which
    # can be cleaned up at a later date.
    user = signed_in_resource ? signed_in_resource : identity.user

    # Create the user if needed
    if user.nil?

      # Get the existing user by email if the provider gives us a verified email.
      # If no verified email was provided we assign a temporary email and ask the
      # user to verify it on the next step via UsersController.finish_signup
      email_is_verified = auth.info.email && (auth.info.verified || auth.info.verified_email)
      email = auth.info.email if email_is_verified
      user = User.where(:email => email).first if email

      # Create the user if it's a new registration
      if user.nil?
        user = User.new(
          name: auth.info.name || auth.extra.nickname ||  auth.uid,
          email: email ? email : "#{TEMP_EMAIL_PREFIX}-#{auth.uid}-#{auth.provider}.com",
          password: Devise.friendly_token[0,20]
        )
        user.skip_confirmation!
        user.save!
      end
    end

    # Associate the identity with the user if needed
    if identity.user != user
      identity.user = user
      identity.save!
    end

    user

  end

  def email_verified?
    self.email && self.email !~ TEMP_EMAIL_REGEX
  end

  private
  def set_default_role
    add_role :user
  end
end
앞서 언급한 바와 같이 Twitter로 로그인했거나 알 수 없는 이유로해서 OAuth provider 서비스가 검증된 이메일주소를 반환하지 못하는 경우, 또한 의도적으로 사용자로부터 별도의 추가 데이터를 얻고자할 경우 아래와 같은 별도의 조치를 취한다.
[1] config/routes.rb 파일을 열고 아래와 같이 라우트를 추가한다.
...
match '/profile/:id/finish_signup' => 'users#finish_signup', via: [:get, :patch], :as => :finish_signup
...
[2] users#finish_signup를 구현하기 위해서 users_controller.rb 파일을 열고(없다면 app/controllers/ 디렉토리에 해당 클래스 파일을 생성함), 아래와 같이 추가한다.
class UsersController < ApplicationController
  before_action :set_user, :finish_signup

  # ...

  def finish_signup
    if request.patch? && params[:user] #&& params[:user][:email]
      if current_user.update(user_params)
        current_user.skip_reconfirmation!
        sign_in(current_user, :bypass => true)
        redirect_to current_user, notice: 'Your profile was successfully updated.'
      else
        @show_errors = true
      end
    end
  end

  private
    def set_user
      @user = User.find(params[:id])
    end

    def user_params
      accessible = [ :name, :email ] # extend with your own params
      accessible << [ :password, :password_confirmation ] unless params[:user][:password].blank?
      params.require(:user).permit(accessible)
    end
end
만약, 의도적으로 위의 코드에서 OAuth provider를 통해서 로그인할 경우 강제로 이메일 확인절차를 실행하고자 한다면 current_user.skip_reconfirmation! 코드라인을 코멘트 처리하면 된다.
이제 users#finish_signup 액션에 대한 뷰 템플릿 파일(app/views/users/finish_signup.html.erb)을 생성하고 아래와 같이 코드를 추가한다.
<div id="add-email" class="container">
  <h2>Add Email</h2>
  <%= form_for(current_user, :as => 'user', :url => finish_signup_path(current_user), :html => { role: 'form'}) do |f| %>
    <% if @show_errors && current_user.errors.any? %>
      <div id="error_explanation">
        <% current_user.errors.full_messages.each do |msg| %>
          <%= msg %><br>
        <% end %>
      </div>
    <% end %>
    <div class="form-group">
      <%= f.label :email %>
      <div class="controls">
        <%= f.text_field :email, :autofocus => true, :value => '', class: 'form-control input-lg', placeholder: 'Example: email@me.com' %>
        <p class="help-block">Please confirm your email address. No spam.</p>
      </div>
    </div>
    <div class="actions">
      <%= f.submit 'Continue', :class => 'btn btn-default' %>
    </div>
  <% end %>
</div>
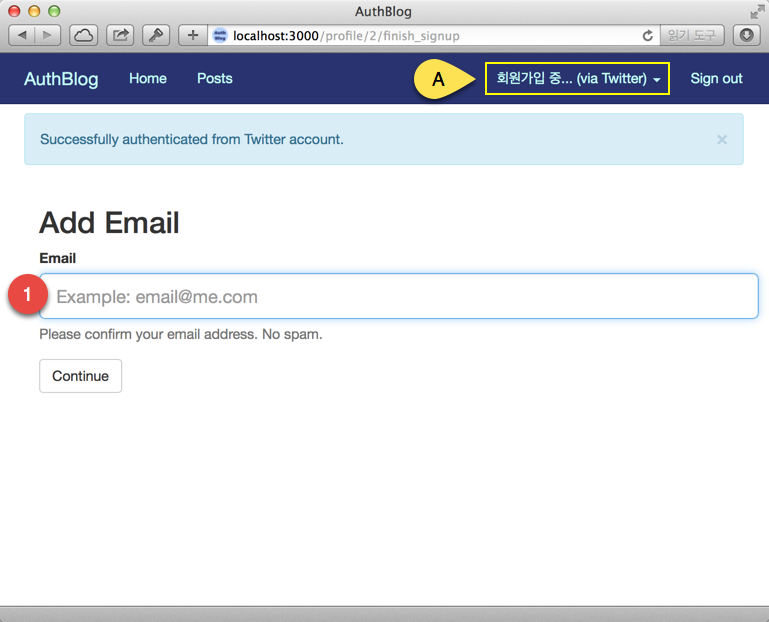
위에서는 사용자로부터 이메일 주소(1번)만을 추가로 입력토록 했지만, 이외에도 여러가지 다양한 정보를 사용자로부터 입력을 강요할 수 있다. 예를 들어 비밀번호 입력을 받아 나중에 로그인할 때 비밀번호를 요구받을 수도 있다. 또한, 현재의 인증 상황을 표시하기 위해서 app/views/layouts/_navbar.html.erb 파일을 열고, 상단 로그인 부분의 뷰 상태를 아래와 같이 수정한다.
...
<% if user_signed_in? %>
  <li class="dropdown">
    <a href="#" class="dropdown-toggle" data-toggle="dropdown">
      <%= current_user.email_verified? ? image_tag(current_user.image) + current_user.name : "회원가입 중..."   %>
      <%= current_user.identities.size == 0 ? "" : "(via " + current_user.identities.map(&:provider).join("/").titleize + ")" %>
      <b class="caret"></b>
    </a>
...
다음은 선택사항이지만, 사용자가 특정 자원을 접근할 때 사용자 인증에 필요한 모든 필수 데이터를 제공했는지를 체크할 수 있으면 매우 효과적인 로직을 구현할 수 있다. 이를 위해서 ApplicationController 클래스에 아래와 같이 ensure_signup_complete 메소드를 추가한다.
class ApplicationController < ActionController::Base

  ...

  def ensure_signup_complete
    # Ensure we don't go into an infinite loop
    return if action_name == 'finish_signup'

    # Redirect to the 'finish_signup' page if the user
    # email hasn't been verified yet
    if current_user && !current_user.email_verified?
      redirect_to finish_signup_path(current_user)
    end
  end
end
그리고 이 메소드를 컨트롤러의 before_action으로 아래와 같이 지정하여 사용하면 된다.
before_action :ensure_signup_complete, only: [:new, :create, :update, :destroy]
자, 이제 이 정도면 마무리가 되는 것 같다. 브라우저에서 지금까지 구현한 내용을 확인하자.
References: