허로쿠에 배포하기
Devise의 :omniauthable 기능을 구현하기 전에 먼저 지금까지 작업한 내용을 실제 Production 서버로 배포하여 확인해 보기로 한다. Capistrano 젬을 이용하여 배포자동화를 준비한 후 원격서버로 배포하는 것이 레일스에서는 표준으로 되어 있지만, 여기서는 아직 레일스에 익숙치 않는 초보자의 고통을 덜기 위해, 손쉽게 원격서버로 배포할 수 있도록 지원하는 허로쿠 서비스를 이용하기로 한다.
허로쿠 배포를 위한 젬 추가
Gemfile에 아래의 젬을 추가하고 Gemfile 파일의 끝에 본인이 원하는 루비 버전을 명시해 주어야 한다. 이것은 허로쿠에서 요구하는 사항이므로 여기서는 ruby 2.1.2를 예를 들기로 한다.
gem 'pg`, group: :production
gem 'rails_12factor', group: :production
...중략...
ruby 1.2.1
그리고 지금까지 개발 모드에서 사용해 왔던 sqlite3 젬에 :group 옵션을 추가해 주어 배포시에 이 젬이 설치되지 않도록 한다.
gem 'sqlite3', group: :development
허로쿠 웹사이트에 앱 추가하기
허로쿠 웹사이트를 방문하여 새로운 앱을 추가한다.
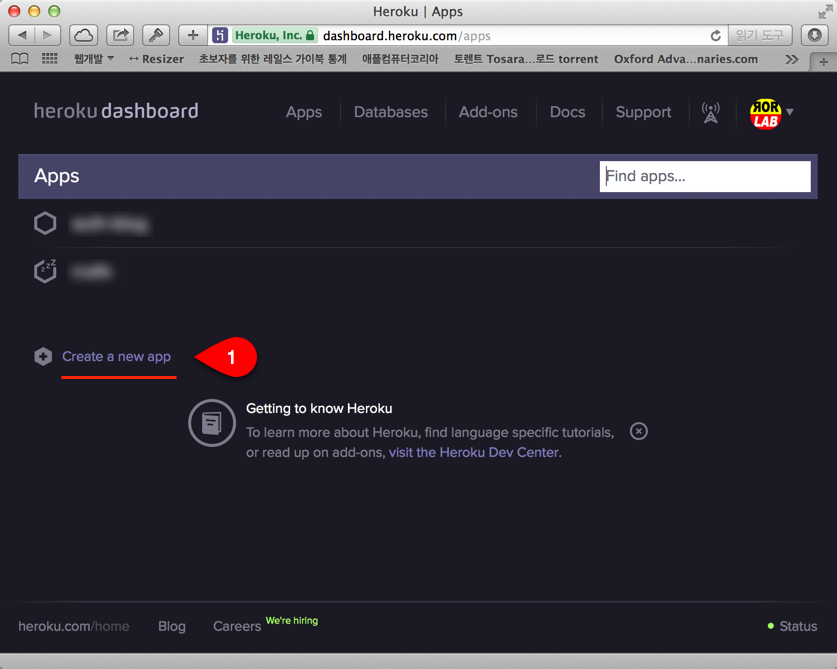
1번으로 표시된 곳의 Create a new app 링크를 클릭하여 새로운 앱을 생성하면 허로쿠 git 저장소의 주소를 알 수 있다.
이제 로컬 프로젝트 디렉토리에서 주소를 이용하여 git 로컬 저장소에 원격 저장소를 추가한다.
$ git remote add heroku git@heroku.com:<app-name>.git
현재까지 작업한 내용을 커밋한 후에 github 뿐만 아니라 heroku로도 푸시한다.
$ git add .
$ git commit -m "허로쿠 배포를 위한 환경 셋업"
$ git push origin master
$ git push heroku master
위와 같이 허로쿠로 푸시하면, 레일스 프로젝트의 배포 과저이 동시에 진행된다. 허로쿠로의 최초 커밋 후에는 아직 PostgreSQL 데이터베이스 가 생성되지 않았기 때문에 아래와 같은 오류 메시지가 나타나게 된다.
마지막 부분에서 아래와 같은 안내 메시지를 확인할 수 있다.
Attempted to access a nonexistent database:
https://devcenter.heroku.com/articles/pre-provision-database
이를 해결하기 위해서, 관련 문서를 보면 아래와 같이 조치하도록 안내가 되어 있다.
$ heroku addons:add heroku-postgresql
Adding heroku-postgresql on auth-blog... done, v4 (free)
Attached as HEROKU_POSTGRESQL_BLACK_URL
Database has been created and is available
 ! This database is empty. If upgrading, you can transfer
 ! data from another database with pgbackups:restore.
Use `heroku addons:docs heroku-postgresql` to view documentation.
이제 다시 허로쿠로 배포하여 성공하면 아래와 같은 결과물을 볼 수 있다.
$ git push heroku master
Fetching repository, done.
Counting objects: 5, done.
Delta compression using up to 8 threads.
Compressing objects: 100% (3/3), done.
Writing objects: 100% (3/3), 360 bytes | 0 bytes/s, done.
Total 3 (delta 2), reused 0 (delta 0)

-----> Ruby app detected
-----> Compiling Ruby/Rails
-----> Using Ruby version: ruby-2.1.2
-----> Installing dependencies using 1.5.2
       Ruby version change detected. Clearing bundler cache.
       Old: ruby 2.0.0p481 (2014-05-08 revision 45883) [x86_64-linux]
       New: ruby 2.1.2p95 (2014-05-08 revision 45877) [x86_64-linux]
       Running: bundle install --without development:test --path vendor/bundle --binstubs vendor/bundle/bin -j4 --deployment
       Fetching gem metadata from https://rubygems.org/..........
       Fetching additional metadata from https://rubygems.org/..
       Using json (1.8.1)
       Installing minitest (5.3.4)
       Installing i18n (0.6.9)
       Installing rake (10.3.2)
       Installing thread_safe (0.3.4)
       Installing builder (3.2.2)
       Installing mime-types (1.25.1)
       Installing rack (1.5.2)
       Installing erubis (2.7.0)
       Installing polyglot (0.3.4)
       Installing arel (5.0.1.20140414130214)
       Installing coffee-script-source (1.7.0)
       Installing sass (3.2.19)
       Installing execjs (2.1.0)
       Installing hike (1.2.3)
       Installing orm_adapter (0.5.0)
       Installing thor (0.19.1)
       Using bundler (1.5.2)
       Installing multi_json (1.10.1)
       Installing tilt (1.4.1)
       Installing rails_serve_static_assets (0.0.2)
       Installing rails_stdout_logging (0.0.3)
       Installing rolify (3.4.0)
       Installing tzinfo (1.2.0)
       Installing rdoc (4.1.1)
       Installing bcrypt (3.1.7)
       Installing rack-test (0.6.2)
       Installing warden (1.2.3)
       Installing treetop (1.4.15)
       Installing coffee-script (2.2.0)
       Installing bootstrap-sass (3.1.1.1)
       Installing uglifier (2.5.0)
       Installing sprockets (2.11.0)
       Installing rails_12factor (0.0.2)
       Installing activesupport (4.1.1)
       Installing sdoc (0.4.0)
       Installing mail (2.5.4)
       Installing activemodel (4.1.1)
       Installing actionview (4.1.1)
       Installing authority (3.0.0)
       Installing jbuilder (2.0.7)
       Installing actionpack (4.1.1)
       Installing activerecord (4.1.1)
       Installing actionmailer (4.1.1)
       Installing sprockets-rails (2.1.3)
       Installing railties (4.1.1)
       Installing simple_form (3.0.2)
       Installing coffee-rails (4.0.1)
       Installing devise (3.2.4)
       Installing jquery-rails (3.1.0)
       Installing sass-rails (4.0.3)
       Installing turbolinks (2.2.2)
       Installing rails (4.1.1)
       Installing pg (0.17.1)
       Your bundle is complete!
       Gems in the groups development and test were not installed.
       It was installed into ./vendor/bundle
       Post-install message from rdoc:
       Depending on your version of ruby, you may need to install ruby rdoc/ri data:
       <= 1.8.6 : unsupported
       = 1.8.7 : gem install rdoc-data; rdoc-data --install
       = 1.9.1 : gem install rdoc-data; rdoc-data --install
       >= 1.9.2 : nothing to do! Yay!
       Bundle completed (22.49s)
       Cleaning up the bundler cache.
-----> Preparing app for Rails asset pipeline
       Running: rake assets:precompile
       [WARN] table 'Role' doesn't exist. Did you run the migration ? Ignoring rolify config.
       Asset precompilation completed (6.62s)
       Cleaning assets
       Running: rake assets:clean
       [WARN] table 'Role' doesn't exist. Did you run the migration ? Ignoring rolify config.
-----> WARNINGS:
       No Procfile detected, using the default web server (webrick)
       https://devcenter.heroku.com/articles/ruby-default-web-server
-----> Discovering process types
       Procfile declares types -> (none)
       Default types for Ruby  -> console, rake, web, worker

-----> Compressing... done, 23.3MB
-----> Launching... done, v7
       http://auth-blog.herokuapp.com/ deployed to Heroku

To git@heroku.com:auth-blog.git
   7041b07..fde8e72  master -> master
이제 http://
배포 후 어플리케이션의 관리자 계정은 admin@email.com, 비밀번호는 12345678이지만 현재는 비번을 변경해 놓은 상태이다.
화면 우측 상단에 있는 Sign up 항목을 클릭하고 사용자 등록 후 게시판에 글을 올려 보자.
이 책에서의 작성한 샘플 프로젝트의 데모를 위한 허로쿠 주소는 http://auth-blog.herokuapp.com 이다.
허로쿠에서 db:reset
허로쿠로 배포된 앱에 대해서 PostgreSQL 데이터베이스를 리셋하기 위해서는 아래와 같이 실행한다.
$ heroku pg:reset HEROKU_POSTGRESQL_BLACK_URL --confirm=<app-name>

Resetting HEROKU_POSTGRESQL_BLACK_URL (DATABASE_URL)... done
허로쿠에서 로그 모니터링
$ heroku logs -t
References: